
Joseki
In last week's column, we mentioned the importance of spreading stones in a balanced manner throughout the board. In most openings, however, sharp clashes, called joseki, take place in the corners. A joseki is an established sequence of moves, each one considered best for both sides. It is tempting to compare joseki with chess openings. In chess, however, the board is comparatively small--64 squares--whereas the go board consists 361 intersections.Consequently, an opening on a chess board will encompass the whole board, but a joseki takes place in only a small part of the go board. For this reason, before choosing a joseki in one corner, it is important to consider the placement of stones throughout the board and to visualize what the final result of the chosen joseki will look like in relation to these stones.
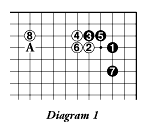 For example, the sequence to White 8 in Diagram 1 is one of the most commonly played joseki. Black secures the territory in the corner with 7, while White stakes out a position at the top. Instead of 8, which is a solid territorial move, White could also play at A, but the choice depends on the position in the upper left corner.
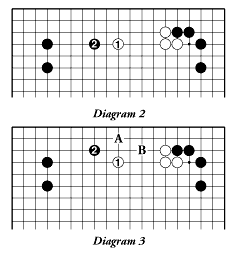
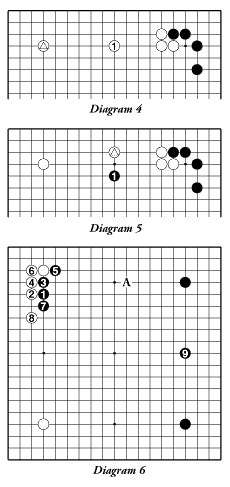
If Black had made a strong position in the upper left corner with the two marked stones in Diagram 2, then it would be prudent for White to play 1 on the third line. Black 2 is a strong move because it enlarges his position at the top, but the stone at 1 is working efficiently in defense of the territory White has staked out at the top.
|
On the other hand, if White has played the marked stone in the upper left corner of Diagram 4, then taking a high profile on the fourth line with White 1 results in a well-balanced position at the top for White.
If White had played the marked stone on the third line in Diagram 5, Black flattens White's position at the top by capping at 1, and the white stones at the top are no longer mapping out territory efficiently.
Suppose that Black has played the two marked stones on the right side in Diagram 6. After White attaches with 2, Black might not want to play the joseki shown in Diagram 1. Instead he might push down with 3. The sequence to White 8 is also a joseki. White gets the territory in the upper left corner, but the wall that Black has made with the stones at 1, 3, 5 and 7 is strategically working well with the two marked stones on the right. Next, Black can reinforce his framework on the right with 9 or reinforce the top with A.
Answer to last week's problem
In Problem 13, you were asked to find the key point for White so that Black cannot make two eyes.
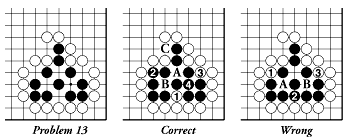 The correct answer is for White to play 1. If Black makes an eye on the left by playing 2, White will atari three black stones with 3. Black will connect at 4, but now he is left with an eye at B and a false one at A. If White plays C, and Black connects at A, White can capture all the black stones on the next move by playing at B.
It is wrong for White to play at 1 (or 3). Black will take the key point of 2, and he is left with two eyes at A and B.
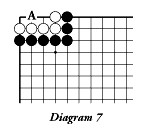 Diagram 7 shows an example of a three-point eye space. I used this position in Problem 12, and the solution was given in last week's column. As I showed, the key point in this position is A. If White plays on this point, his stones will have two eyes, but if Black gets to play here first, the white stones cannot form two eyes and all the white stones are doomed.
Eye spaces come in different shapes and sizes. In some of these shapes, the surrounded stones can make eyes no matter whose move it is. In others, the stones will live and die depending on whose move it is.
Here are six eye-shape problems for you to think about. The answers will appear next week.
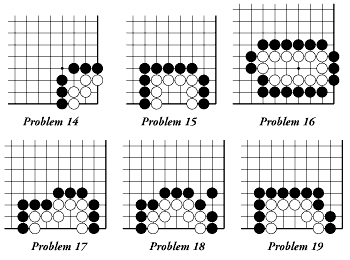 Problem 14. A bent three-point eye space. If it is Black's turn, how can he kill the white stones?
Problem 15. A square four-point eye space. If it is White's turn, can he make two eyes and live?
Problem 16. Another four-point eye space. Can Black prevent White from making two eyes?
Problem 17. A bent four-point eye space. What is the status of this position?
Problem 18. Where is the key point for the life and death of the white stones?
Problem 19. A five-point eye space. Can White make a move here to form two eyes?