
Go proverbs
The go board with its 361 intersections is very large. For the beginner, this arena leaves a bewildering number of moves to choose from, and it can be quite perplexing to find the best move, or even a good one. Fortunately, there are a number of heuristics, known as "go proverbs," which can guide you through the maze of the go board and help you pick out reasonable moves. Perhaps the fastest way for an inexperienced player to improve is to study these proverbs. There are more than 200 go proverbs, here are some examples.
"Play in the center of three stones!"
In the position in Diagram 1, it is Black's move and he has to make two eyes for his five stones if they are to live. A player's first instinct might be to make Black's territory as large as possible by playing 1 in Diagram 2; after all, the larger the space a group of stones have the more room they will have to make two eyes. But it is not that simple.
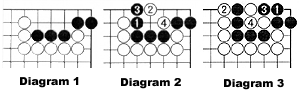
After Black 1, White 2 becomes the key point. Black prevents the invading white stone from linking up to its allies on the outside by blocking at 3, but White cuts at 4 and the black stones cannot avoid capture. If Black wants to resist, he must start at 1 in Diagram 3, but White 2 puts the five black stones in atari. If Black ataris with 3, White captures the five stones with 4. Playing Black 1 at 4 first is unreasonable because Black puts his own stones into atari.
Black 1 in Diagram 4 does not give the black group two eyes either. White plays 2. If Black 3 next, White plays 4. Black must now play 5 and White connects at 6. Black is left with a two-point eye space in the corner, so his stones will die. Black would like to play 5 at 6, but White would capture at 5.
If a player is mindful of the proverb "Play in the middle of three stones!," he would immediately hit on the correct point to give his stones in the corner two eyes. That move is Black 1 in Diagram 5. It is a one-point jump away from the center of the three marked black stones to which this proverb refers.
White might try to kill the black stones with 2 in Diagram 6, but after the sequence to 5, Black has two eyes: one on the 1-1 point and a second one when he captures the two white stones at 2 and 4.
"Ponnuki is worth 30 points."
The shape shown in Diagram 7 is called "Ponnuki." When it is facing the center of an open board, it exerts great strategic influence, and, if used correctly, has the potential to serve the player well. What this proverb suggests is that a ponnuki is a very big move and making one is advantageous.
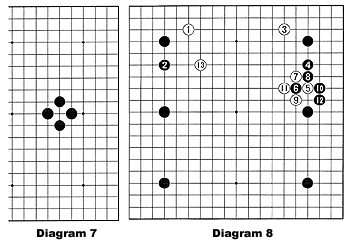
Diagram 8 shows an example of how this shape can occur in a game. White has given Black a six-stone handicap. After White jumps in with 5, Black attacks with 6. Black's aim with this move is to secure the territory on the right side with the sequence to 12. However, White makes the ponnuki shape when he captures with 11. He then plays 13, using his ponnuki on the right to map out a large territory at the top. Even if you know nothing about go, you can see that this shape radiates influence throughout the board and goes a long way in reducing the advantage of Black's six-stone handicap.
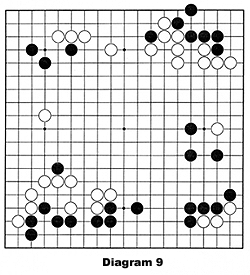
"Play at a critical point rather than make a large territorial move!"
In Diagram 9, Black has to make a crucial decision. If he can make a move in the lower right corner, he will be able to capture the three white stones there and take more than 25 points in profit. However, his three stones in the upper left still lack a base and they could come under a severe attack. If a player follows this proverb, he will opt to stabilize his three stones at the top and let White attempt to live with his stones in the lower right corner.
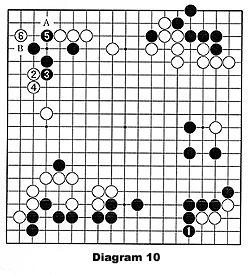
If Black descends to 1 in Diagram 10, the territory in the lower right corner is all his. However, White will attack the black stones in the upper left. After Black 5, White rips Black's base apart with 6. This stone can link up to his stones at the top with A or the ones on the left side with B. Black must make two eyes in the center, but as he struggles to do this, so White will gain enormous profit in the center. Black has a lost cause.
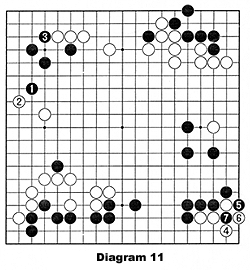
It is urgent for Black to stabilize his three stones in the upper left by playing 1 and 3 in Diagram 11. With these moves, he get at least 10 points of profit in the upper left corner and his stones there are secure while they counter White's influence in the center. White can live in the lower left corner by creating a ko with the sequence to Black 7, but this is a localized fight and has little strategic significance.
This is Richard Bozulich's last Magic of Go column.