
When planning strategy and ways to avoid falling into traps, we have to be able to visualize the available choices and their permutations, even when there are no stones on the board. At first it is really difficult, but with practice it gets easier.
As young kids under the spell of the game, we often did this just for fun. We played the game by calling out coordinates, with no board or stones at all--the game was all in our heads. If you like a challenge, do this with a partner, starting with a 9x9 board. Once you can play a game till the end, work your way up to a 13x13 board and even to the full 19x19 board. It is a good idea to have an impartial referee, who plays the game on a real board.
The coordinate system is as follows. The horizontal lines are numbered from 1 through 19, while the vertical lines are from A through T (I is not used). A-1 is then in the lowermost left corner while T-19 is in the uppermost right corner for the black player. The opposite holds true for the white player.
For those who can't find a partner, practicing tsume-go (life and death problems), is another system.
Life and Death
Before they can become a pro, young players are supposed to study tsume-go problems intensively. But it takes hard work and intense concentration. The majority of pros study other pro games and new joseki and moves, but a few young pros concentrate on solving problems or even composing new ones, in addition to their normal studies. It is very hard work, but eventually it pays off and they start winning titles.
However, for most of us, there are not enough hours in the day to study everything, and we have to make choices. One helpful tool is the book Life and Death by James Davies. Written in 1975, it presents problems in a systematical way and is still on the go best-sellers list. Let's see why it's so popular.
Chapter 3 is about four- and five-space eyes.

Problem 1: Both of the following problems are based on the one shown here. Where should Black play to make his stones alive? Conversely, where should White play to kill the black stones?
Problem 2: What do you think about this black group? Is it dead or alive, or does it depend on who plays first?
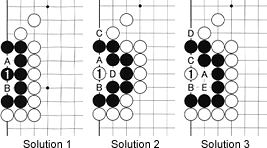
Solution 1: Black 1 is the vital point for making two eyes, A and B. That way the group can't ever be put into atari, as White can't play at either A and B (playing at these points would be suicide, which is against the rules).
If it were White's turn, he should play at 1 to prevent Black from making two eyes. (You can find plenty of information about this in earlier go columns on The Daily Yomiuri homepage.)
Solution 2: If it were White's turn, he should strike at the heart of Black's formation with 1. If Black plays at A through D, he would only lose liberties, so there is no point to playing in this area. White, on the other hand, can play at A, then at B, then at C, which forces Black to take three stones with D. Next, White strikes again at 1. This shape reverts to Solution 3.
On the other hand, if it were Black's turn, he should play at 1 to instantly make three eyes.
Solution 3: If you understand Solution 2, you should be ready for Problem 3. White should play at 1, the heart of the black formation. Black can't make a second eye in this shape, but White can play A through D. Four stones are captured when Black plays at E. Then the shape reverts back to Problem 2, with White to play first. In other words, Black is dead.
Problem 4: What is the status of this group? Hint: First think about how White can get the shape in Solution 1. Then how Black can try to avoid that shape if it is his turn.
Problem 5: What is the status of this group? Hint: See Problem 1 and 4.
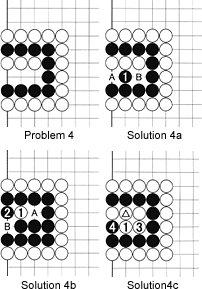
Solution 4a: Black should play at 1, making this a seki (stand-off, neither player can proceed). After this move, neither player should waste another move in this area. It is obvious Black shouldn't play at A or B, as all of his stones will be taken off the board immediately. But why can't White play at A or B?
Suppose White plays at A. Black will capture with B and we get the following shape.
Solution 4b: After Black captures four stones, we get this shape. It is White's turn, but even if he plays at 1, black 2 will give Black two eyes. White can't capture Black, because he can't play at either A nor B. Note that White could also start by playing at 2, but then Black would play at 1.
Solution 4c: On the other hand, if it is White's turn, he should play at 1, too. Black can't counter this, as that would be a quick way to die, but White can proceed with 3. Now Black can capture five stones, but the open space formed looks like Problem 1 and White can kill the Black group by playing where the marked white stone is.
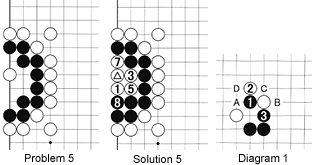
Solution 5: White should play at 1 (and if it were Black's turn, he should do the same). Black can't really make a move of substance, so he passes in this area. White can then go on with 3, then 5 and 7. Now Black has to do something to avoid being captured immediately. So he takes with 8. Next we get the shape from Problem 1 again, and White can play where the marked white stone is.
Solutions to last week's problem
The problem was what should White do when confronted with black 1 and 3 (see Diagram 1). White probably shouldn't cut below 1. Instead, depending on the circumstances, he should choose between A through D.
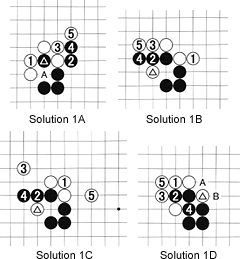
Solution 1A: If the left side is important, white 1 seems a good move. Black could move up with 2 and 4, but now White can resist with 5. If, instead of 1, White cuts at A, the marked black stone might possibly be joined at some stage with a stone at 1. In this diagram, though, the worst black's marked stone can do is to connect at A.
Solution 1B: If the marked stone is unimportant, White could extend to 1 to build influence in that direction. The moves through 5 are a possible continuation. It is clear White is building center influence.
Solution 1C: If the marked stone is unimportant and White needs to build strength in the center, he could opt for connecting with 1. The moves through 5 are a possibility. White builds center thickness in tradeoff for Black's profit.
Solution 1D: Under certain conditions, White can resort to playing at 1. If Black follows with 2, white 3 forces black 4. Next, White can make a secure connection with 5, giving him overwhelming influence. This is too good to be true. Usually Black would play at A instead of pushing at 2. In that case, White must be prepared to extend to B and fight.