Young turk wars (***)
In title matches, both players often are afraid to show their hand too soon and games carried in newspapers sometimes appear rather unexciting. In contrast, the lower ranking young turks go all out, often resulting in large semeai (countering moves), all-or-nothing ko fights, and hand-to-hand fighting that start in one corner and spread all over the board.Refreshingly, this was what we saw in this game between Cho Chikun (Black) and Norimoto Yoda (White) for the Meijin title. The latter lost the battle but won the war and the title in this game.
Cho's Overplay
We began this game last week with White playing the last move at 68. Up to this point, White was constantly on the run.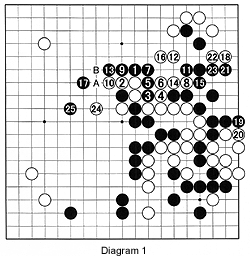 Diagram 1 : When Cho plays at 1 (actually 69 in the game), he is sure to have taken the whole situation into consideration. White's moves to 16 are forced so than he can connect his large lower right group to his upper right corner. Now, Cho's move at 17 is the move that should make the difference (this is as far as he could have read without making too many assumptions about White's moves).
White first forces with 18 to 22, then elegantly defends with 24 as a preparation to strike a bolt himself. Note that he does not exchange A for B first. Also note that black 17 and 25 are not attachments-as we saw in the article about attaching two weeks ago, this is in line with principles about attacking. Making attachments only serves to strengthen the opponent.
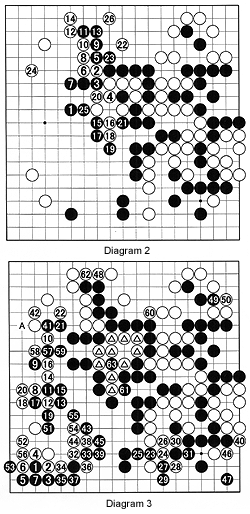 Diagram 2 : After black 1, White strikes back at 2. This induces the exchange 3 for 4, giving White a good eye-shape. In addition, Black is now saddled with a cut. Black 5, induces the exchange 6 for 7 which serves to enable black 15 and 17 later. So far, Cho has read things well. Yoda attacks with 8 to 12, then let out a mutter of surprise when Cho plays at 13. Cho had apparently read something Yoda had not. White 14 was not greeted well by the analysts. Black 15 to 21 kill the white group in the center, and the analysts thought it was all over. But then White plays 22, 24 then 26-incomprehensible moves at first sight (see Reference 1).
Diagram 3 : After Black kills the marked white group in the center, he seems headed for certain victory as he invades with 1 to 7. But with white 8 to white 22, White secures the whole left side. Black manages to cut off a stone with the sequence 23 to 31, but the more you think about it, the worse things seem with the capture of the white group in the center (see Reference 1). In the actual game, after black 63, White captures that stone. Black fills in the space below and a ko starts. In the end, Black even cannot seem to win the ko, and resigns on move 196 (last 15 moves are not shown).
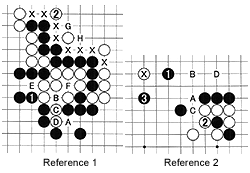 Reference 1 : After black 1 and white 2, there is a semeai. Black's stones have eight liberties (indicated by X's), whereas White's surrounded stones have five liberties in ko-black A, then black B, white C, black D, black E, black B again and if he wins the ko at B/C, Black can play at F in order to capture. Of course, Black wants to break into White's territory with G or H, but in the ensuing fight he may lose two liberties or more. That would mean the ko becomes a serious issue that Black cannot afford to loose.
Finally, even if Black wins the ko, he has to add stones in his own territory to actually capture the white stones. There are only 10 white stones, meaning Black's territory would be exactly 20 points, not a big deal. At the same time, White secures territory around G and H, worth more than 10 points in addition to having secured a large corner in the upper left, for a grand total of about 30 points in this area of the board. In other words, Black's local success here was a pyrrhic victory that finally cost him the title.
Reference 2 : In retrospect, instead of 1 in Diagram 2, Black should have played at 1 here. White 2 is probably best. Black can then continue with a double corner approach at 3, pincering the marked white stone. Later on, if white A, Black can answer with B, and white C with black D.
Solutions to last week's problems
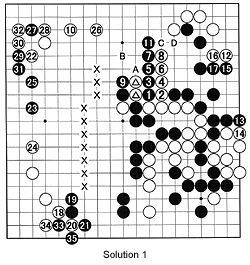 Solution 1 : Instead of 1 in Diagram 1, Black should have cut with 1 shown here. Black 9 initiates a ladder. White 10 is a ladder-block. But black 11 is a good move. This captures the two marked white stones-if white A, black B. Furthermore, Black is aiming at cutting at C and D although white defends against this threat in sente with 12 through 16. The moves 18 through 35 are one example of how the game could continue. The crosses in the middle of the board indicate the line where Black could possibly make territory without too much effort-the perks that come with having influence and strength.
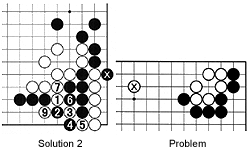
Solution 2 : After Black played the marked stone, the combination of 1, 3 and 5 are a good rebuttal. Black can capture white 3 by playing at 4 and 6, but after white 7, if Black connects at 3, he loses everything when White cuts at 9.
Problem
Black to play and cut off the marked stone.