Through its playful incorporation of logic, go can help improve reasoning. Let's see if we can reason ourselves to a higher level of go with the knowledge we have gained in the past couple of weeks.
Wariuchi
The wariuchi technique uses our knowledge of how to make a base-remember, a base is essentially a two-space jump from another stone. How do we establish a base in an enemy sphere of influence ?Diagram 1 : White has a position in both corners at the bottom. Black 1 is a wariuchi or "splitting move" as it splits up White's position. What are the virtues of the wariuchi ?
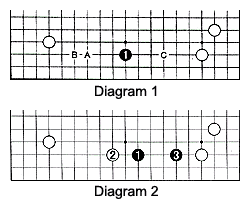 1. It makes miai of extending to the left at A (or alternatively at B) and extending to the right at C. Hence, it always makes a base;
2. It avoids getting pincered; 3. It is an easygoing move that avoids direct confrontation. But it has disadvantages too:
1. It's slow; 2. It puts little pressure on the opponent.
From these advantages and disadvantages you can see when you need to apply a wariuchi-when the opponent has strong positions in your territory or when you control more territory and want to avoid a fight.
Diagram 2 : This wariuchi at 1 is sometimes played too. Compared with the previous diagram it is one space to the right. This time, White will rarely want to extend from his shimari (corner enclosure) on the right and will almost always approach from the left, such as at 2. Of course, Black then makes a base with 3.
Diagram 3 : Going back to Diagram 1-this is a situation that often arises-let's look at some main variations. If Black plays at 1, in most cases White will approach from his shimari, as the three-space extension between the shimari and 2 is supposed to be ideal. If Black plays the standard two-space pincer at 3, white 4 keeps up the attack while protecting the lower left corner (and his base too). Black 5 is a peaceful follow-up. But then white 6 makes just about an ideal shape-this is good because it turns the lower left corner into sure territory. The black formation is not yet immune from attack. White can get a look at A. Black B would be the normal response, but then White can later play at C to split Black's position or take away his base.
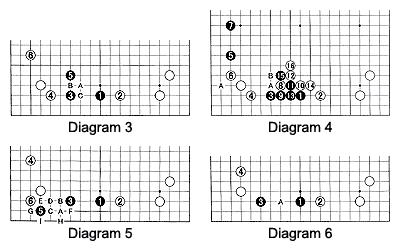
Diagram 4 : Therefore, Black will often play at 5, which has the features of a wariuchi too-it makes miai of extending to A or to 7. If White plays at 6 to prevent Black from sliding into the corner at A, Black makes a second base with 7. The base at the bottom is weak and vulnerable to a fairly strong-but not deadly-attack. For example through the combination 8 and 10. White 8 through 16 are a sort of middle game joseki (standard exchange). But instead of 16, White could try a more aggressive approach by playing at A or B.
Diagram 5 : If White wants to avoid the previous diagram, simply playing at 4 is an alternative. Then Black will often want to play 5 as quickly as possible (to avoid Diagram 3). White 6 in response is optional. It is large in terms of territory, but has little attacking potential. White A, black B, etc., through white 1 are a large endgame combination for White.
Diagram 6 : Last week, we had a look at this situation. At that time, instead of 4, White invaded at A. However white 4 is a relaxed approach. Because black 1 and 3 form a three-space extension and are therefore vulnerable to an invasion at A, they still need reinforcement. At the same time, waiting for a white invasion at A may be Black's excuse to start a fight.
Problem 1 : In this case, preventing a shimari at A or B is possible, but then Black would almost certainly pincer around C. Can you come up with a wariuchi strategy ?
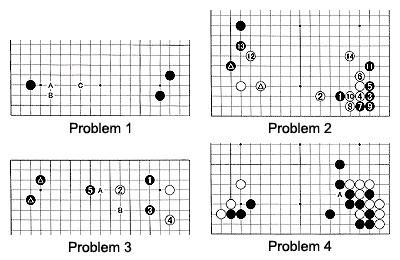
Problem 2 : If Black approaches with 1, especially after the exchange of Black's marked stone for White's marked stone, White will almost surely pincer with 2. The moves to 14 offer one variation, and the point is clear: Black is forced to invade in an area where White is strong. Instead of 1, can you find a suitable strategy to avoid this scenario ?
Problem 3 : Here Black plays 1 to prevent a white shimari. White would like to pincer with 2, but backed up by the marked shimari, black 5 answers with his own pincer after first exchanging 3 for 4. Sure, White can run away with B, but it will be a complicated battle. Can you apply the wariuchi technique here ?
Problem 4 : (intermediate) This is a more difficult problem. It occurred in a game 30 years ago between two stars of the era, Shuko Fujisawa (white) and Yoshio Ishida (black). To have a chance of winning, White needs to invade the black sphere of influence. Where to play a wariuchi? (Find out next week.)
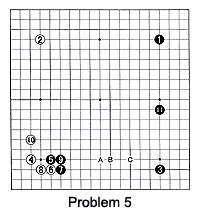
Problem 5 : (advanced) Instead of extending from his three stones on the lower left with a move at A, B or even C, Koichi Kobayashi, who was Black, choose to play at 11. Cho Chikun, his opponent in this 3rd game for the Honinbo title match in 1992, had several options. He used the wariuchi technique even though he could not obtain a full base (an extension of two spaces) in both directions. The first move is easy, but what happens afterwards ?
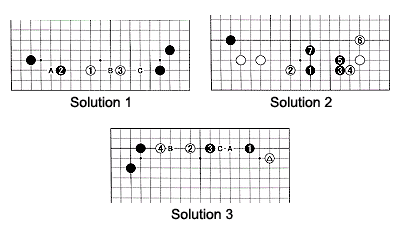
 Solution 1 : White 1 is a good wariuchi. It makes Black wonder if he should play at 2 (or A) or at the other side-at B. Usually though Black would make a shimari at 2 (or A). Later on, a move at C is important for both parties.
Solution 2 : Black 1 is a suitable wariuchi. White 2 is the standard move in such cases. Black extends to 3 and white 4 before 6 forces black 5 (while reinforcing at 7 is often advocated.) The black shape is a little overconcentrated.
Solution 3 : White 2 is a calm approach. Black can now play at B, but then white C is a good move. Or Black can follow this diagram and play at 3 followed by white 4. Once the marked white stone has become stronger, White can look forward to invading at A.