
Solutions to last week's problems
Solution 1 : This one-step ko is worth 34 points. Of course, the value of the ko is roughly the same as in last week's example-where there was a black stone at A-in which White stood to win 16 points and Black 18 points, for a grand total of 34 points.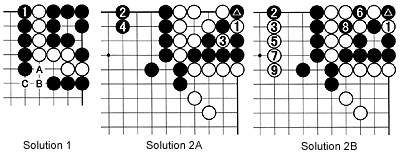
In some cases, A may be a move that has some added meaning (preventing a cut there). In that case, it has some value, but, in general, these kind of moves seldom do.
So if Black wins the ko, he would need three moves to capture the white stones. It is tempting to say that the value per move is 34 divided by three, which equals 11-1/3 per move.
This is incorrect. The first move is worth zero, while the next two moves decide who wins the ko and its value. In short, these moves are worth 17 points each.
In other words, starting a one-step ko should be avoided, if you have to make a move that is worthless, unless, of course, you have an overwhelming advantage in ko threats.
Solution 2A : This is a multistage ko with 36 points. The problem here calls for the value of the ko that Black started by playing the marked stone. That part is easy. Just look at the end result of White winning is in this diagram and Black winning in the Solution 2B diagram.
When White wins he stands to capture eight stones and 10 points in territory, for a total gain of 18 points. When Black wins he also stands to capture eight stones and 10 points in territory, also 18 points. So, the total value of the ko is 36 points. But it would take Black three moves to win against White's two.
In the Solution 2A diagram, if White plays at 1, Black makes a ko threat at 2 (although not necessarily there). White can now capture the ko with 3. In exchange, Black can finish his ko threat with 4. So Black's compensation for losing the ko would be two moves.
In contrast, the Solution 2B diagram illustrates what would happen if Black won the ko. First, he needs to play a ko threat (represented by 2), which is answered by white 3. White now can play ko threats with 5 and 7. If Black is to win he needs to ignore both threats to play at 6 and 8. If White then plays at 9, his compensation for losing the ko would be three moves.
Therefore, starting a ko is as questionable for Black as it is for White. On the other hand, if one side has an overwhelming material advantage in ko threats, the other side may want to play at the spot where the marked black stone is (for White) or where white 1 has been played in both diagrams (for Black).
Example from pro games
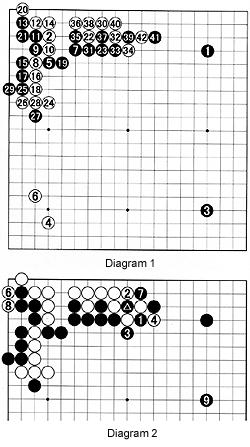 Diagram 1 : In this game between two Japanese professionals, a drawn-out joseki is played out in the moves to 31. White 32 is usually played at 39, but this is a little on the slow side. White 34 is a direct challenge. Black cuts with the sequence to 39 then jumps to 41, a typical pro move (see Reference 1).
Diagram 2 : The moves to 3 are unavoidable but after white 4, a ko erupts suddenly. Black takes the ko with 5 (played where the marked stone is shown). White makes a large ko threat with 6 to capture the upper left corner. Black ignores the ko threat, captures an additional stone with 7 and goes on to build a huge moyo (framework) on the right side with 9.
What is the value of the ko? Is the compensation of the upper left corner enough ?
The problem with this ko is that its value is simply too large to express quantitatively. It came into existence more through guts than anything else. But it is not without reason.
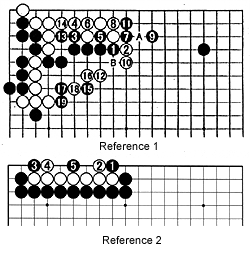 Reference 1 : When Black pushes with 1, white 2 challenged Black to cut, which he did with 3 to 7. Black 9 was an excellent move. A lesser player might have played at A. If White now extends to 10, black 11 (in combination with 13) threatens to kill the white group at the top (see Reference 2). White can try to capture the black stones, but the combination of 15, 17 and 19 effectively provide an escape route.
Reference 2 : White's formation is seven stones in a row (similar to Reference 1). If it is Black's turn, he can kill White with the combination of 1 and 3 (to restrict White's space), and then 5 (the vital point). In contrast if it is White's move, he can keep his group alive by playing at 1 (or 3, or even 5).
New Problems
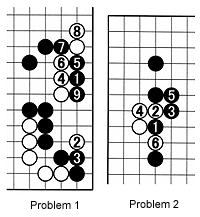
Problem 1 : Black 1 is a strong attack. White 2 is a clever move. If Black persists with 3 to 9, how should White proceed ?Problem 2 : This is a common situation in handicap games. After white 6, how should Black respond?