
The secrets of the lazy
I make no secret of the fact that I would rather lie on a sofa than sweep beneath it. But you have to be efficient if you're going to be lazy.
British designer, journalist
In teaching on modern management with its emphasis on leadership, the manager determines the most efficient way to cut a tree, a good manager decides which tree to cut, but it is a true leader who determines what forest to select.
A moral victory of laziness over stinginess
Takemiya once made a comment describing his opponent's go as subway go," adding that everybody wants to go to his location, but why not enjoy the scenery on your way there? And it has to be said, Takemiya's cosmic go is spectacular to watch and enjoys high ratings among amateurs. His style seems so easy (almost lazy), yet the profound depth of his reading is first-rate. Kobayashi, on the other hand, plays a practical type of go that has been described as opportunistic. His keen reading and ability to pick the right place for the next battle have earned him many titles.
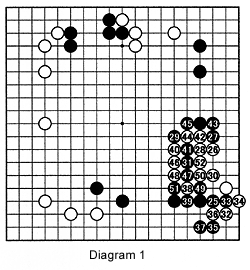 Diagram 1, denying White a foothold to start a fight, Black 25 is the right response. With 26 to 30, White makes the beginning of a base. Black 31 shuts of White's escape route to the center, leaving White no other options than to make two eyes. The combination of 36 and 38, earn White the right to squeeze Black 41, 31 and 47, forcing Black to connect at 53 and again at 55. But White 56 and 58 are required to ensure life. A is an eye, but Black can play B, White C, Black D, White E, Black F taking away White's second eye. 58 allows White to make a second eye at H by playing at G the moment Black forces the sequence A to F. At the end of Diagram 1, White has spent 13 stones to make two eyes (or 2-5 points, depending on who plays at G first).
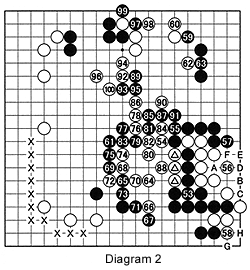 Diagram 2, meanwhile, Black has built a wall that radiates its influence all over the board, while the cleverly played marked stones have as little impact as a fly on an elephant's back. Black 61 forces White to either sacrifice his "fly" or run away. White again chooses to make an independent life through the sequence from 64 to 88, spending 12 stones on a mere two points. Once again Black gets the outside. An added bonus is the scenic black 89 to 100 in which Black captures four white stones, while White's stones at the top are still not 100 percent alive. You might think that White lays a heavy claim on the XXX marked area, but nothing is further from the truth: Black goes on to lay waste to most of the lower left corner and the left side area, thanks to his strength in the center.
Going on to win the game fairly easily, Black's play persuasively demonstrates the power influence can have and the misery you can find yourself in when your only quest is that for territory or the destruction of territory claimed by the opponent.
Think lazy!
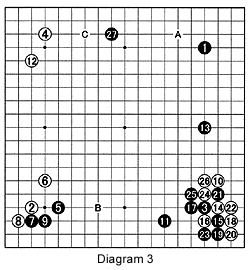 Diagram 3, this is a game between Yoshio Ishida, then 7-dan (Black) and Shuko Fujisawa, 9-dan played in the 1971 Honinbo league. After the corners have been divided, Black 13 both pincers White 10 and is an extension from his stone in the upper right corner. White uses 16 as a sacrifice to push all the way through to 20 and captures Black 21 with 24 and 26 to obtain eye space. Black 27 is large as it is an extension from his own stone and simultaneously restrains the influence White 4 and 12 exert toward the right. If you now pick A or C as your next move, nobody can criticize you. B is a good candidate too, but after studying the game above, a diligent student of laziness can find Fujisawa's next move. Find out next week if you are a Master of Laziness.
Answers to last week's problems:
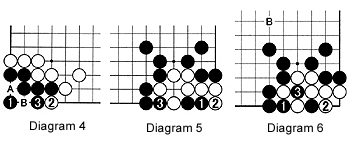 Diagram 4, Black 1 is correct. A and B are always two eyes. You may be inclined to affording Black with more living space by playing at 2, but then White hits hard at B, leaving Black with no choice but to start a ko at 1.
Diagram 5, Black 1 kills the white group. White would like to play at 3, but he can't as this puts him in atari. If White plays 2, Black 3, takes away the potential second eye.
Diagram 6, Black 1 is a mistake, as White does not connect at 3 but captures with 2. Black can only get a ko with 3 now.
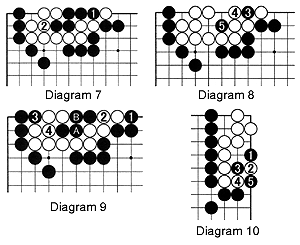 Diagram 7, a wonderful sacrifice this is! Black 1 forces White 2. Diagram 8, then Black 3 and 5 leave White with just one eye. Diagram 9, this is wrong. In the sequence to White 4, White captures four black stones. Now envision the situation after taking off these black stones. If Black next plays inside White's area at A, White B follows, and vice versa, assuring life. (A situation in which Black takes one spot and White the other and vice versa, is called miai.)
Diagram 10, black 1 takes away White's second eye. Amazingly, this stone is connected to Black's main group as the sequence to 5 shows.