Thickness-a hard issue
Go is in fact a game of economics. In general, the person who allocates his resources most effectively wins. This is obvious in the beginning of the game when both parties stake out positions, and at the end of the game when the exact value of a move can often be counted. But in the middle of the game, tactics are a major determinant for the final outcome. But even then, games are decided by how well the stones work together. In theory, these tactical maneuvers including the "endgame" and "life and death" (tsume go) are relatively easy to master because all that is required is training, which can be done by yourself at home as a wealth of material is available.But to improve your understanding of the opening, you need an open mind, imagination, a good teacher, and the willingness to use your own and other people's experience to your advantage. So the question is, how do you use your stones economically ?
Economics in go
A couple of weeks ago we discussed extensions and how many spaces should be left between the stones from where the extension takes place. At that time our goal was to establish a base.Diagram 1 : The basic extension is the two-space jump when there is a stone on the 3rd line. When your objective is to establish a base, this is your operating rule of thumb.
 Diagram 2 : And if you have a two-stone wall, you should be a little more ambitious and go for the three-space jump. Usually the two-stone wall is counted from the 3rd line, i.e. if there is a stone and one on the 4th line, this is counted as a wall of two stones and a three-space extension is warranted. But if there are stones on the 2nd and 3rd line only, it becomes difficult to decide whether you should play a two-space or a three-space extension.
Diagram 3 : We used the knowledge above to establish a presence inside the other party's sphere of influence by using the wariuchi technique. Here is an example: White is strong on both the left and right sides. So how do you establish a base ?-by playing right in the middle so that you can make a two-space extension in either direction. So even if White plays at 2 you can make a base with 3. Alternatively, if White plays at A, Black plays at B.
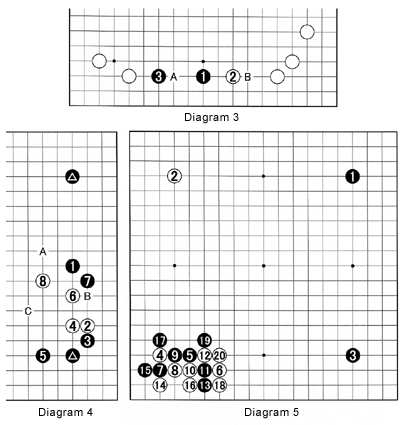
Diagram 4 : We built on this knowledge to make more economical extensions when our priority was not to establish a base but to expand our position. The basic position with two marked black stones on the star-points followed by black 1 is a tried and true fuseki (opening) that is easy for beginners and intermediate players. Its basic tenet is that it is difficult for the opponent to establish a base. For example, White may invade at 2. Black 3 prevents White from sliding into the corner and makes White heavy. The meaning of the word "heavy" here means that after White invests another stone at 4, these two stones cannot easily be abandoned, while they do not contribute much in the way of eye-space.
Next, if White is to make an extension it is likely to be at 6. Black 7 spoils any chances of White building eye-space at the edge and White is forced to move toward the center, e.g. to 8 or C. After white 8, Black can continue his attack with A, B or a move around C, depending on his style and the circumstances. Anyway, the bottom line is that White cannot establish a base inside Black's sphere of influence.
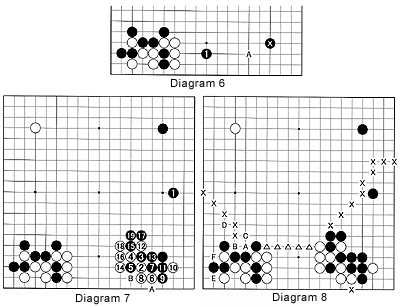
Diagram 5 : Arguably, White's stones are not optimally placed as he chooses a joseki (standard corner exchange) in the lower left corner that leaves him with gote. Black has sente, but what should his next move be ?
Gote means to play the last move in a sequence and thereby lose the initiative.
Sente means to play the next move and keep the initiative.
Diagram 6 : (Wrong!) Would you have played at 1 to counter the influence of the White stones ? Probably you wouldn't, but you might have played at A (the best move locally) to counter White's influence. If you had chosen A, you are a fairly strong player already and you might be ready to go to the next level.
Diagram 7 : (Correct) Black 1 is the best move (better than on the 4th line). Even if White makes a long extension to 2, Black has a splendid way of overconcentrating White's stones with the combination of 3 and 5. The moves to 19 are a joseki. Later, Black might even be able to exchange A for white B.
Now look at who has played his stones more economically.
Diagram 8 : The black and white stones on the upper edge of the board have the same value. Now have a look at the sphere of influence of Black's positions (shown with XX's) and White's position (shown with **'s (**'s=two Triangle). Black's combined positions are much larger. White can later exchange A for B, C for D, and E for F.
Solutions to last week's problems
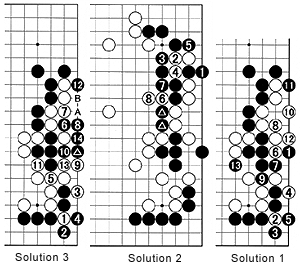
Solution 1 : After black 1, White can exchange 2 to 5, then live with the sequence to 10. However, Black gets to play 11 in sente if he is prepared to answer 12 (which threatens ko) with a move at around 13. White lives but Black's position on the outside suffers while Black gets to play at 11 (a difference of three points in double sente, which is unbearable for top pros).Solution 2 : If Black mistakenly plays at 1, White will cut with 2 and 4 and again with 6 and 8-Black loses his pivotal marked two stones.
Solution 3 : After Black's marked move, White can force with 1 and 3, then connect at 5 but Black will capture with the sequence to 14 (or a variation, by playing 6 at 8). White loses the capturing race as he can't play at A (Black captures with B).