Building castles
If you are going to build something in the air, it is always better to build castles than houses of cards.
German physicist and philosopher Lichtenberg (1742-1799) did not play go as the game was not introduced to the West until the beginning of this century. But he certainly understood the principles of building up a position.
Go basically has two kinds of playing styles--territorially based and influence-oriented. Last week, we discussed some rudimentary extensions such as the two-space and three-space jump on the third line. Two-space jumps make use of only two stones at a time. Isn't it possible to increase synergy?
Let's have a look at a game between Masaki Takemiya, 9-dan, who is widely regarded as the expert on the use of influence, or moyo, and Koichi Kobayashi, 9-dan, in the fourth game of the Judan title played on April 16, 1992.
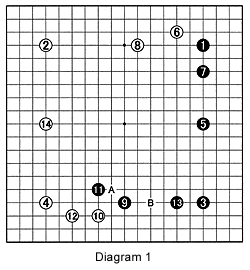 In Diagram 1, most moves in the beginning are played on the fourth line. With 1, 3 and 5, Black occupies the three star-points on the right side, a formation called san-ren-sei. This pattern sets up a large framework, inviting White to come in. Black then aims to use his superiority in numbers to keep White's invaders weak. To cope with Black's strategy, the single most important thing is to stay calm and invade as late as possible. White 6, black 7, and white 8 are a standard pattern, more or less finishing off one corner with adjacent (half) sides. Black 9 indicates Takemiya's expansive mood. With 10, White tries to keep the black moyo in check, while black 11 again increases his potential by pressing White down. White 12 extends a helping hand to white 10 while strengthening the lower left-hand corner and aiming at a cut later at A or an invasion around B. Black 13 prevents the latter while strengthening the corner. With 14, White moves into a moyo mode himself, inviting Black to make the first invasion.
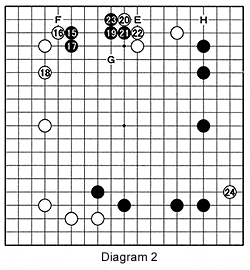 In Diagram 2, this is exactly what happens. Notice that Black is not able to comfortably make a (two-space) base inside White's sphere of influence and vice versa.
Black invades between the widest space available within White's framework. White 16 and 18 are a standard combination against black 15, forcing Black into a slightly overconcentrated shape.
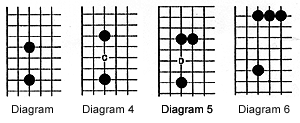
The principle for extensions is outlined in Diagrams 3 to 6. In Diagram 3, a two-space jump is considered ideal as a base without weaknesses, but a three-shape jump has an inherent weakness in the middle at C in Diagram 4, as we saw last week. Diagram 5, however, a three-space jump from a wall of two stones is a strong position, making an attack at D risky. Likewise in Diagram 6, a four-space jump is feasible from a three-stone wall. Therefore, if a three-space extension from a two-stone wall is ideal, a two-space extension is less than optimal, resulting in an overconcentrated shape.
 Back to Diagram 2, with the sequence from 15 to 23, Black makes an incomplete base. White can attack these stones by playing at E, F or G, depending on the circumstances. Since it is too early to tell now which one of these three moves is best, White should first strengthen his own stones by sliding into the corner with H. Instead, with 24, White plunges right into Black's power base using a submarine technique. Although this move is too early, Black has difficulty in responding. What move do you think Black should make? The answer will appear next week.
Answers to last week's problems:
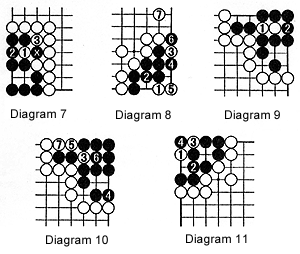 Diagram 7, white 1 threatens to capture the black marked stone, forcing Black to capture the white stone with black 2. Next, white 3 puts the marked stone into atari for the second time. Irrespective of Black defending his marked stone, he cannot manage to make a second eye to survive.
Diagram 8, white 1 threatens a snapback at black 2. Black is therefore forced to play at 2. White 3 first reduces black's living space and then strikes at the vital point with 5 (to prevent a ko that Black can otherwise set up at 5). Capturing at 6 increases liberties but not eye space nor number of eyes. Sooner or later, Black will have to connect at 3 and then it is clear that Black has only one eye.
Diagram 9, White 1 is a tricky move. Even if Black captures with 2, white 3 in Diagram 10 prepares for the snapback with white 5 when Black tries to make his second eye with 4. Notice that when Black does not capture with 2 in Diagram 9 but plays at 4 straight away, White plays at 5 in response; this changes the order but not the essence.
Diagram 11, white 1 aims at the snapback at 2, making black 2 inevitable. White 3 then starts a ko, in which Black is the first to capture a stone, but nevertheless he is the one who can lose his group. This kind of one-sided ko is called a hanami (flower-viewing) ko.
Problems
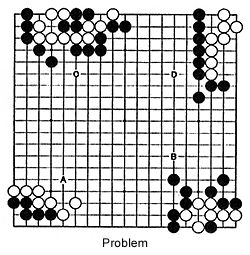
Problems test your skills. With Black moving first, avoid ko in Problem A, capture without ko in Problem B, and kill the white groups in Problems C and D.