
The Concept of Life
It's me or him! That's often what we hear when people play games in which the opponent needs to be destroyed in order to win. In a way that is a very simple one-track concept and it makes for games that can be easily understood, even by computers. The whole game is in effect a series of tactical collisions. Tactics involve a lot of calculating and computers tend to be better at that than humans.But go is not a single-minded one-track game. Yes, tactics are involved, but ideally exchanging blows should serve a greater purpose: a coherent strategy. And surprisingly often, this greater strategy calls for losing a fight locally in order to win globally. So when does the fighting end? Locally it often does when a group has ensured life. This means that a group cannot be attacked any more.
Diagram 1 : Even if surrounded, this black group is immune to attack: it is alive. Remember, in order to capture stones, their last liberty should be taken away. So how would White be able to accomplish that? First he would need to play at A (or B) and then at B (or respectively, A). But that is impossible, because playing at A or B in itself doesn't take away Black's last liberty, but a white stone at A would have no liberties at that moment. Therefore, this is in direct conflict with the rule that says a stone without liberties cannot exist.
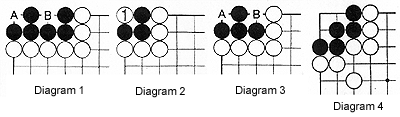
Diagram 2 : In contrast, the three black stones shown here can be captured by white 1.
Why ? Because white 1 takes away the last liberty of the black group. In the previous diagram however, White is never able to do that.
Diagram 3 : Then what about this Black group ? It still has two liberties so White cannot play at A. However, White can play at B first and put the black group in atari (atari is the situation in which a group has only one liberty left). And next, White can play at A and take four black stones off the board.
Diagram 4 : So what's the status of the five black stones ? Are they dead or are they alive ?
Diagram 5 : If White starts, he could play at 1. Black can't move because he would be putting himself into atari. So let's assume black 2 plays somewhere else (not indicated in this diagram). Then on his next move, White can play at 3 which puts the black stones in atari. However he also puts himself in atari. Black can now capture two stones by playing at 4.
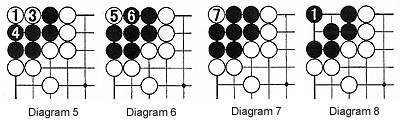
Diagram 6 : But this is not the end of it-White can come back and play inside Black's territory by playing at 5 (or 6). Black can capture once more, but.....
Diagram 7 : White can now capture six stones by playing at 7.
Now go back to diagram 4-Where should Black play, if it were his move ?
Diagram 8 : Black 1 is the correct move in this situation. Verify White cannot play at either side of black 1, because that would be suicide. And if White can't kill the black stones, it means they are alive. So these two open, separate spaces on each side of black 1 are the key to life-we call these open spaces "eyes." So to be alive, a group needs two eyes.
Solutions to last week's problems
Solution 1 : In response to black 1, White should capture the marked black stone with 2. Now it is ko, i.e. Black can't immediately recapture by playing where the marked stone was. He first needs to play somewhere else (and if White answers), then he can capture white 2 by playing at the point where the marked stone was. Of course, White could ignore Black's move and connect by playing where the marked stone was.Solution 2A : This is a little more complicated. In response to black 3, white 4 is the best move. Now Black starts filling in liberties from the outside. Let's assume White takes the 'Wait and see' attitude and passes (let his turn go by) or plays somewhere else. (At any rate, his moves are not reflected in these diagrams.) Black fills in from the outside, then finally at move 11 puts the white stones and himself in atari and White captures with 12....
Solution 2B : However Black plays at 13 (notice that if White could play there, he'd be alive) and then at 15 only to be captured with white 16.....
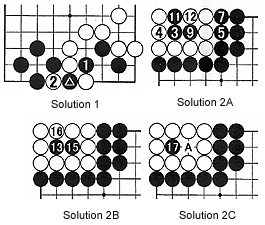
Solution 2C : But then he comes back at 17, and yes, White could capture at A but it's all useless-in the end White's captured.
Now have another look at diagram 2 and 5 and see the similarities. The only difference is the scale and the number of moves it takes to capture, but the essence is the same.
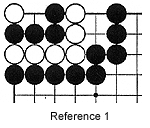
Reference 1 : This was the original situation. After seeing the solution diagrams 2A through 2C, you see that if it is Black's move, he can capture all white stones.
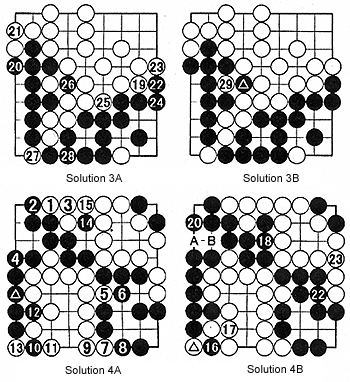
Solution 3A : White 19 takes points at the edge. Black 20 is sente (a move that needs to be answered), then enlarges his territory by playing at 22 and 24. Next white 25 is worth one point. In the end, Black captures the ko with 26. White 27 is a ko threat-Black needs to respond with 28.
Solution 3B : After black 28, White can recapture with 29. Confirm that Black has no ko threats. So in the end White can connect at the point where the marked black stone was taken.
Black : Territory 14 points plus Stones captured 4 stones equals 18 points
White : Territory 19 points plus Stones captured 7 stones equals 26 points
So not including any komi, White wins by 8 points.
Solution 4A : After Black's last move where the marked stone is, white 1 and 3 are a combination that force Black to add a move at 4. The rest is just endgame technique where all the territory borders are closed off in the most efficient way. Black 10 and 12 are a clever maneuver that threaten a ko. Black has a ko threat at 14 and.....
Solution 4B : White gives way with 17. White plays 19 where the marked white stone is and 21 where black 16 is (these two moves are not shown in the diagram). Black 20 is necessary as otherwise White would play at A, black B and white 20, killing the black group.
Black : Territory 8 points plus Stones captured 2 stones equals 10 points,
White : Territory 11 points plus Stones captured 8 stones equals 8 stones
So not including any komi, White wins by 9 points. Next week we will look at some opening moves and strategies.