
Don't mistake movement for action !
In business, when making vital decisions, we should make a distinction between urgent and important matters. Dealing only with pressing business will palliate the existing situation, but it would still be 'coping with' instead of 'being in charge.' Using neoteric buzz words, we refer to this as reactive as opposed to proactive. In your daily life this could mean you would go to the doctor as a reaction to disease, but in a broader sense it is more sensible to take charge before health becomes a problem by exercising, doing yoga, or even some plain ol' trout fishing or just relaxing in any other way. In other words a wise plan is more effective than a lot of running around.
In go, we have this same principle of "an ounce of prevention is worth a pound of cure."
Last week I ostensively described this as "lazy," at the same time I was actually referring to well-composed, all-round erudite judgment as opposed to short-term action merely resulting in just running around and looking busy. But this onerous line of playing will prove unavoidable when setting only short-term goals. A splendid example in which short-term thinking was eradicated to be replaced by the long view was a game we started last week between Yoshio Ishida (Black) and Shuko Fujisawa (White).
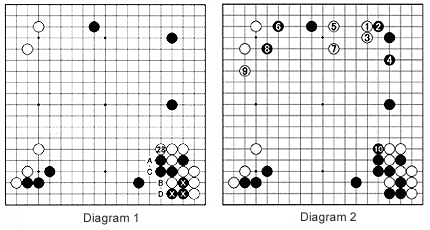
Diagram 1, if you picked white 28 in answer to last week's problem, you are a true Master of Laziness. This move looks tardigrade and lacking in inspiration, but is very powerful indeed. Diagram 2 shows the usual move. The sequence 1 to 7 looks natural enough, but in response to white 7, Black may grab sente ( that is take the initiative) by playing 8 for 9 and switch to 10. Black may even play in a completely different way and get sente anyway to play at 10.
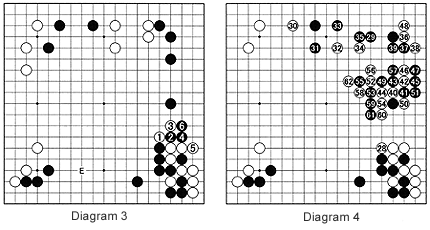
Note that White's prospects to break into the center are morose, as demonstrated by Diagram 3 when in the sequence to 6, Black cuts of the white stones 1 and 3. Therefore, Black's influence would radiate throughout the board, making a white invasion around E a daunting yet inevitable task. If we now compare the actual move to Diagram 2, it becomes apparent what a powerful move white 26 is. Diagram 4, since White didn't invade in this area, Black played at 29 and after 31, he has a large moyo (framework, potential territory). Thanks to the thickness he built up with 28, White successfully reduces Black's moyo in the moves to white 62. With 36, 38, and 48, White even builds a life group inside Black's moyo. Sadly, later in the game, White makes some serious mistakes, and with good play Black goes on to win the game and, finally, the tournament, becoming the youngest big title holder of his time at the age of 22.
Answers to last week's problems:
Diagram 5, the combination of black 1 and 3 put White on the spot as he can't play at A due to damezumari (shortage in liberties).
Diagram 6, using damezumari (by White), black 1 is the key point. White 2 is the strongest response, but with 3 to 7, Black kills the white group. Note that Black shouldn't capture the four marked white stones, as they are unimportant for the life of the white group. See also the explanation for Diagram 8.
Diagram 7, black 1 and 3 exploit damezumari by White, and even after white 4, Black can play 5, preventing White from getting two eyes. After seeing this diagram you may conclude that the marked stone is not necessary.
Bonus question for this problem, Diagram 8, why is the marked stone necessary? Without the marked stone, in response to black 1, white 2 is effective. If Black tries to kill with 3, white 4 is severe, but thanks to the marked stone, black can now play 5 and 7, forcing White to connect eventually where White captured black 1. Therefore, this capture does not give White an eye, although it appears to be one. This is called a false eye and a solid understanding of the concept of false eyes is essential in Life and Death problems.
Diagram 9, this is a straightforward damezumari problem.
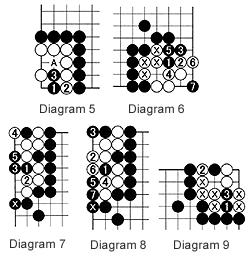
Black 1 and 3 put two separate groups (the marked stones) in atari-this is called double-atari-and takes either group.
Linking up Stones
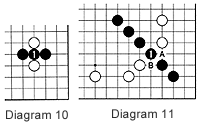
Diagram 10 shows one basic way of connecting your stones. Black 1 connects and cuts the white stones at the same time.
Diagram 11, this diagonal move is another basic way of linking up stones. Black 1 simultaneously cuts White as well. If White plays at A, Black plays B and the other way around. This situation is called miai. Black is therefore connected through miai.
But there are other ways of connecting, sometimes more effectively. Below are a number of problems in which you have to connect Black's stones.
Problems
In each of the following four problems A to D, Black plays the first move and connects his marked stones.
