
Toughing it out (**-*****)
Released from tension, some people fall ill on day one of a vacation. The same is true for situations in sports and games. You find yourself struggling through an ordeal, and the moment you think the fight is over, you let go. At that point, you are doomed.The recent game between Keigo Yamashita and Koichi Kobayashi that decided the Gosei title is a perfect example of how things can go wrong when tension breaks. The moment Yamashita relaxed, he made an almost fatal mistake. Yamashita is White.
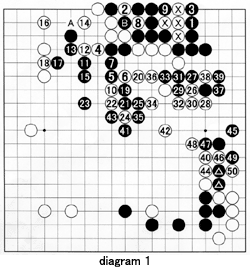 Diagram 1 : After Black's action on the upper side of the board, White was in trouble. But by sacrificing his four marked stones, White was able to play hane at 4. Black could not cut now and had to recede with 5. White 6 spoils Black's shape, and 7 is the best answer, however painful. But White then went into the overdrive mode and played hane at 10, allowing Black to seal him in with 11. Refer to Solution 2 for details.
In the sequence to 18, White manages to live by either connecting at A or securing his second eye with B (the black stone is not there at that point as White captured it when he played 8). Being forced into such a low position would normally clinch the game, but now it is Black's turn to feel relieved, return the favor and play a questionable move with 19. See Figure 1 for details.
Resisting with 22 is natural and the hane of 24 feels good since Black has to make an empty triangle (bad shape) with 25. White 26 and 28 are a good combination that utilizes the motare (leaning attack) technique.
Black resists strongly with 27 through 33 but his weakness in the center is exposed when White attaches at 34, then connects all of his stones with 36.
White 40 tries to make use of the same motare technique again by leaning on the relatively strong black stones on the lower right in order to strengthen himself (as well as his opponent) in order to attack in the center. However, Black backs off and captures three white stones in the center with 41 and 43. White retaliates by seizing the two marked black stones in the exchange to 50. This seizure is larger than it looks as Black's stones on the lower edge have become thin. The repercussions will become apparent in the next diagram.
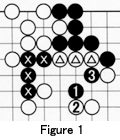 Figure 1 : Instead of 19 in Diagram 1, black should have played at 1 in this figure. White's best reply is 2, but then black 3 captures the three marked white stones. This is a valuable capture because it immediately makes Black's group, including his marked four stones, strong and thick. This frees Black's hands to fight all-out elsewhere on the board.
Diagram 2 : Black invades White's moyo and creates a living group but White grabs sente and plays the unlikely but spirited move of 60, sacrificing that stone in threatening to start a ko with 62 and 64. Black gives in by playing it safe with 65 but White takes the ko with 66 at 60 (not shown). Black then plays a ko threat with 67 but White ignores the threat and fills the ko with 68 at the marked black stone.
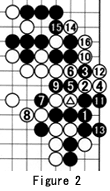
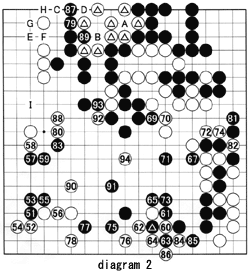 Black then attempts to threaten the white center group in the upper right with 69 and 71 then defends with 73, a grave mistake. White 72 was not just meant to defend, it also has a devastating follow-up white 74. See Figure 2 for details.
Black 79 is a severe move. White can save his marked stones by filling in at A (in Diagram 1) but then black can exchange 89 for B and then play at C threatening a ko with D. If White foils that plan by playing at D himself, Black has possibilities at E and G (answered by F and G, respectively), after which Black has his pick of places to invade on the left side, around I.
 So White decides to expand his territory with 80 and 88 while defending against an impending invasion at I. He thereby sacrifices his marked stones, but it takes Black three moves to actually eliminate all bad potential (aji ga warui) and capture the white stones.
When White plays 94 (final move in this diagram) he destroys most of Black's center potential and goes on to win by 2-1/2 points to claim the game and the Gosei title, worth about $100,000.
Figure 2: After white 74 (the marked stone), if Black connects at 1 and then tries the tesuji of 3 and 5, he does get a double atari. But when White defends with 8, Black has to capture with 9 and loses his cutting stone (3) after white 10. Black now can live with 11 and 13, but white 14 and 16 severely erode Black's territory in the upper right.
Solutions to last week's problems
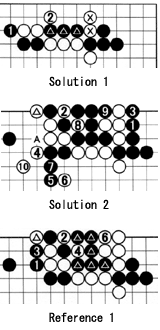 Solution 1 : Black 1 is a blunder-white 2 puts him on the spot. No matter what Black tries, his marked stones will not get more than two liberties, whereas the marked white stones maintain three liberties. Therefore, the marked black stones die.
Solution 2 : Black has to submit with 1. White 2 and 8 are sente too, but it cannot be helped. Finally if White plays at 10 (better than 10 in Diagram 1), Black cannot cut at A, thanks to White's brilliant tesuji of throwing in at 2 (see last week's column) before playing the marked stone, setting up a potential ko that is not good for Black.
Reference 1 : Black 1 and 3 are wrong. White 2 and 4 take the ko (two times). At this point, White will capture with 6 and secure a large territory while setting his weak stones free, regardless of where Black plays at 5.
New Problems
Next week we will talk about motare or leaning attack as shown by white 26 and 40 in Diagram 1. The following two problems deal with this issue.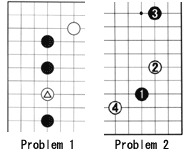 Problem 1 shows a standard situation, in which the leaning attack is employed. White has just invaded with the marked stone. What should Black do ?
Problem 2 : The sequence 1-4 occurs frequently. How should the motare technique be used to attack white 2 ?
(The number of h indicates the difficulty level with one representing beginner and five the most advanced. )