
Applying the theory
For the past two weeks we have studied ko and kikashi on a theoretical level. All the kikashi shown in this week's column are from actual games. Diagram 1 especially is interesting as it relates to the problems professionals face during their matches. By using a board and stones to lay out the positions, you will understand how professionals feel during their games.I also recommend watching go games on TV or on video because you will see exactly what the pro sees. There is no hint about the next move, unlike when you follow a game on a diagram. Such real-life situations will lead to intense concentration, which is the only way to improve.
Let's start with the solutions to last week's problems.

Solution 1 : The question was whether black 1 was a kikashi or not. If White answers by connecting at 2, black plays at 3. In turn, White will defend at 4. If Black now gets to play around A, it is clear that the exchange 1 for 2 is favorable for Black; on the other hand, if White gets to exchange B for C and they play around A, the exchange may not be favorable. In effect, the exchange 1 for 2 may or may not be kikashi, depending on the situation.
Reference 1A : If Black omits the exchange A for B, later on he may want to invade at 1. If White answers with 2 and 4, black 5 connects his stones. White cannot play at C to cut as black D puts the marked white stone in atari. Note, how disastrous the exchange A for B would be in this diagram. Note also that black 1 would be answered by White with a move at C to prevent the connection.
Reference 1B : Another problem that should be addressed is what happens if White resists, e.g. by playing at 2. Black can now play at 3 to prepare for the cut at 5 in sente. The sequence to 15 is one possible outcome. Depending on the situation the white wall could be put to better use than Black's profit on the right side.
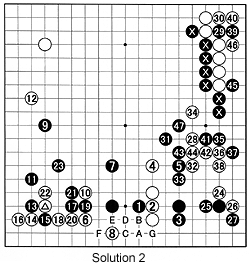 Solution 2 : Black 1 is correct. At this stage, White will connect with 2. Black 3 next is what is referred to as an "natural flow" (choshi-ga-ii)-the exchange 1 for 2 has strengthened Black on the left side but White also has become stronger. Black 3 takes away White's eyes and defends Black's corner territory (please note this order of priority). For reference, the moves to 47 are included. Note the kikashi moves 15 (white 16 was a bad response as black 17 and 19-hreatening to capture the marked white stone-are good for Black), white 24 and 26 and black 29 to 39 (that make 45 sente). Black 41 forces 42 which in turn provides a kikashi at 43 and finally one at 47. In the end White's group dies. Also note how the marked black stones in the upper right contribute to the attack on White's groups.
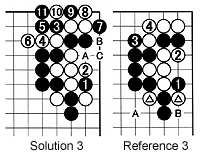 Solution 3 : Black 1 is an excellent kikashi. If white 2, Black can (later) play the combination 3, 5 and 7. Notice the effect of the exchange 1 for 2 now. After 7, White cannot play A, because black B and white C would puts himself in atari. Therefore, white 8 offers the strongest resistance, but black 9 is a clever move that starts a ko. If White loses this ko, he has two dying groups in the corner.
Reference 3 : Because he cannot afford this ko, White will have to submit with 2. Now the kikashi black 3 for 4 is proper timing. Black then can play at A or B to capture one of the marked white stones.
Kikashi in an actual game
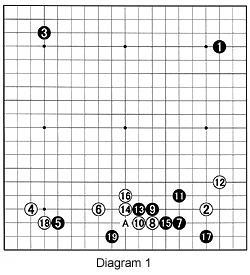
Diagram 1 (1-9) : In this game between Satoru Kobayashi (Black) and Norio Kudo, we can observe a few interesting kikashi combinations. First of all, black 9. Black does not mind making white 8 stronger as this stone is strong in the first place because of the presence of white 6. How many people would want to invade at A instead? But once you understand the underlying concepts of kikashi, your play will rise to a higher plane. Black 13 is another kikashi whereas black 15 aims at cutting at A.Explanation 1 : Instead of 15 in the diagram, Black could have played at 1, which looks like a kikashi, but then after white 2, black 3 is no longer sente.
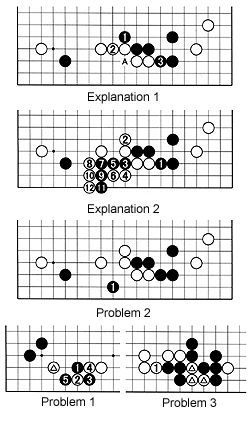 Explanation 2 : After white 2, Black cannot cut at 3 as the moves 4, 6, 8 and 10 capture the black stones in a so-called "loose ladder."
New Problems
Problem 1 (intermediate): Black can invade at 1 and capture the marked stone. But even though this stone is captured, White has plenty of kikashi maneuvers to make the situation even. How can he sacrifice the marked stone and still get as many kikashi as possible ?Problem 2 (intermediate:) Black 1 (19 in Diagram 1) is a great kikashi. How should White respond ?
Problem 3 (advanced): White has just played at 1 as he intends to use the marked white stones to their maximum potential. How does Black respond to minimize the kikashi effect ?