
Basic strategy of go
During the Spanish conquest of Peru in the 1530s, the conquistador Francisco Pizarro was able to defeat vast armies with less than 200 men. In accomplishing this feat they were greatly helped by the state of mind of the Incas who believed the Spaniards were gods. But Pizarro's men also had weapons, a purpose and training in the art of war. Go is often linked to war strategies, but even tactics involving "sacrifice" can be employed.In modern warfare, logistics and communications are often serious problems for a leader to consider. If the troops are self-sustaining, this will greatly enhance their viability. The same holds true in go--a live group will not be a burden to other stones or groups, whereas a weak group can drain resources from friendly groups, sometimes by as much as 20 points.
Before engaging in the nitty-gritty of tactics, the best way to increase the odds of your success is to map out your potential territory efficiently, by creating a synergism between the stones you have played; in other words they should be helping one another and be versatile in the functions they perform.
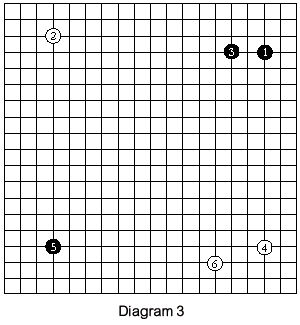
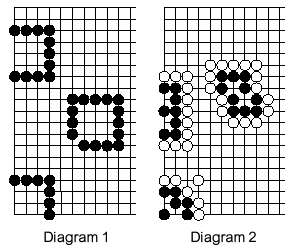 In Diagram 1, the seven black stones in the corner surround nine points of territory. Near the edge, Black needs 11 stones to earn nine points, while encompassing nine points in the center requires 15 stones. For the sake of argument, we will assume positions in which all black stones are connected. To reinforce this idea, let's look at some living groups. In Diagram 2 Black has made the smallest living group possible in three different locations. Black uses only six stones in the corner. But, at the edge, he needs eight stones, while in the center 10 stones are required for the minimal living group.
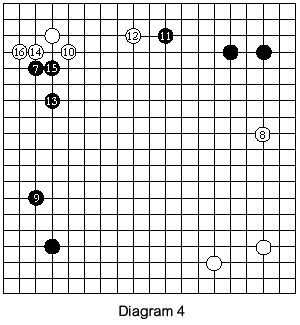
It is clear that with a limited number of stones, the corners hold the most promise for territory. The edges are next, and finally the center. This is reflected in games between professional players, especially in older games, as is illustrated in the game shown in Diagram 3 played in 1951 between Utaro Hashimoto 9-dan (black) and Eio Sakata 9-dan (white). The first six stones are used to lay claim to the four corners. Such moves, shown by Black 1 and 3, and White 4 and 6, are called "shimari" (corner enclosures). They are considered to be ideal to stake out corner territory.
The black shimari in the upper right potentially maps out 12 points of territory in the corner and maybe a couple of points on the outside. Sometimes we refer to this as "his sphere of influence," and depending on what stones are in the vincinity, the value of this influence can either grow or atrophy. Black's two stones here are probably worth about 14-18 points, equivalent to 7-9 points per move. The white shimari in the lower right corner seems to encompass more territory as it potentially claims 15 points in the corner and also seems to yield more influence toward the sides. However, as the stones are farther apart, they have inherent weaknesses as well. It is the skill of the players that will determine how much of the potential territory is eventually turned into actual territory.
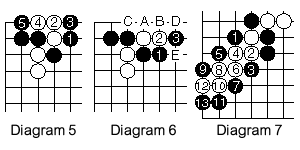
 It should goes without saying that if making a shimari is valuable, then preventing your opponent from making one is equally important. Therefore, it is natural for Black to play 7 in Diagram 4.
As we established earlier, the sides are next in the line of priorities. Against the backdrop of White's shimari in the lower right corner, White 8 makes perfect sense. It not only is an extension from White's shimari below, it also counters the influence of the black shimari above. White 8, therefore, has a dual purpose, and multiple-purpose moves are usually the best ones, even if hard to find.
Black 9 is another dual-purpose move: it is an extension from the black stone in the lower left corner, and it lends a helping hand to Black 7 above. It is also a kind of shimari, but it does not prevent White from entering the corner at A. It sets up several threats against the lone white stone at 2 (in Diagram 3) as well. White 10 defends against these potential threats by staking out a high position at the top. This is an important principle in go: a high position (on the fourth line) provides an easier escape route toward the center, whereas a low position (on the third line) provides a base, leading, ideally, to (two) eyes. In theory, stones on the fourth line have more potential for territory, but they have no base and an enemy invasion is easier. The subtle pros and cons of taking up positions on the third or fourth line are characteristic of a player's individual style. Professionals express their idiosyncratic ideas through such differences.
We will discuss the rest of the opening, or fuseki, of this game next week.
Following are the answers to last week's problems:
 In Diagram 5, Black 1 takes away White's penultimate liberty--this is called atari. Resisting with 2 is futile as Black plays 3. White 4 is followed by Black capturing at 5. Black can also play at 1 in Diagram 6. If White tries to run away at 2, Black 3 follows. Playing at A or B by White does not increase liberties and Black can answer with C or D respectively. White's strongest resistance is cutting at E. But then Black takes away a liberty at A, putting the two white stones in atari. No matter what White tries next, Black can capture the two white stones on his next move.
In Diagram 7 putting the lone white stone in atari with Black 1 is the correct answer. White may try to escape by increasing his liberties to two, but Black will put two stones in atari. White can try to escape again, but Black constantly keeps White in atari through the same procedure. White never manages to increase his liberties to more than two; each time he is put into atari again by Black. In the end, all White's stones are captured. This method of capturing is called a ladder, or shicho, and occurs frequently, even in professional games. In practice, of course, a ladder will seldom be played out to the end.
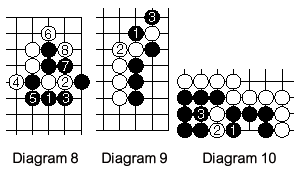 In Diagram 8, Black starts with the atari of 1. Even if White runs away at 2, Black 3 follows. The best White can do is the sequence to 9 given here, but he loses his original stone.
In Diagram 9, Black first cuts with 1 putting a white stone into atari. White connects with 2 and Black 3 puts another white stone into atari. Running away to the first line is not productive as we have seen in Diagram 5. Therefore, the white stone is effectively captured.
Black 1 in Diagram 10 is the only move to foil white's plans for a snapback, the technique I discussed last week. Even if White now attempts 2, Black can capture and make two separate spaces, or eyes, assuring life.