The art of stealth
Stealth is a major ingredient in Japanese martial arts. When fighting, people often give away their intention of attacking by squinting or moving their eyes when they tighten their muscles prior to the actual attack. A good practitioner must prevent his intentions from becoming obvious. Ninjutsu is a martial art in which concealment is of utmost importance. In other words, one has to become a master of doing what is not obvious.In a way go is also a game of stealth. Of course, all the moves are revealed to the opponent, but the intentions behind them may not be readily understood..
Diagram 2 : What are the obvious moves ? They are moves to which the answer is so obvious there is virtually no reason to play them. This diagram shows what happens if White plays all the obvious forcing moves first. He tries to come out at 1, then at 3, then pushes at 5. Black can not block at 20 at this point (White will play at 12, which has to be answered at 11, after which White plays at a double atari at A making miai of capturing black 4 and capturing the black stone next to A by playing at 6). Blacks, therefore, he extends at 6. Now White tries pushing with 7 and 9 and then plays out his "ace" ataris with 11, 13, 15 and 17. However, due to damezumari (shortage of liberties) white 19 is answered by 20 and 21 captures one stone, but Black can come back at the place where the marked stone was and capture seven white stones in a snapback. (See comments at Reference 2A/B for more about the snapback.)
Diagram 3 : So let's forget about all the blunt push-and-atari maneuvers and stop giving away the plot too early. The two pushes at 1 and 3 in the previous diagram caused White to run out of liberties. So let's omit them and see what happens then. White cuts down his actions to their bare essentials and plays 1 and 3 to create the plot, then works it out with 5, 7 and 9. Now A and B are miai. Black plays one, White plays the other.
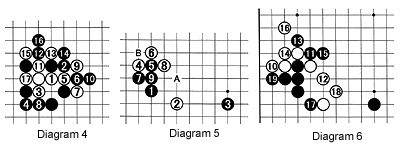
Diagram 5 : The sequence shown here is a standard joseki (standard joseki, or corner exchanges in which the outcome is "even," number in the hundreds and top pros easily know or at least can recognize and reconstruct a couple of thousand joseki). At this point, White can connect at A or B. However....
Diagram 6 : Playing at 10 is an overplay for White. Black has to cut with 11 now, leaving White with no choice but to play at 12. Black 13 is an important move-it forces White into bad shape and shows how wasteful 10 was as a move to connect or reinforce the white position. Black 15 is now a splendid extension toward the center, forcing White to defend with 16. Black 17 must be answered with 18 and Black then defends with 19, securing eyes and a large corner territory while making miai of attacking the white group on the left and the one on the right.
Problem 2 : The moves to 12 are part of a well-known joseki. Less skillful players would play black A, white B, black C, white D and black E. However after this article you should not fall into this trap.
Solution 2 : The throw-in of white 1 (in effect a sacrifice) is the tesuji (locally clever move) here. Black may play at 2 to secure an eye in the corner, but white 3 is another brilliant move putting Black on the spot. Black has no choice but to capture with 4, but white 5 renders the space that black has created at 1 a false eye.
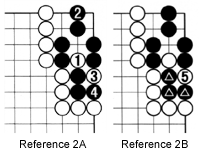
Reference 1 : Instead of securing the corner eye, Black can also capture the white intruder, but now white 3 makes miai of taking away the eye at 1 and the eye in the corner. Black can defend at 4 to secure his eye at 1, but now white 5 takes away the other eye.
Some people confuse this situation with a ko while in fact, it is a snapback. A ko is a situation where a whole board situation threatens to be repeated, which is not allowed. Hence the rule that before taking back the ko that player first has to play somewhere else. But in this case, no board situation is repeated.
Reference 2B : White 5 captures the three marked black stones and no board situation is repeated. This also is called a snapback.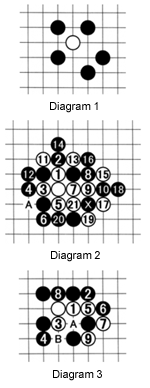
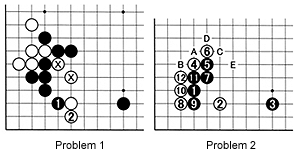 Problem 1 : After black 17 in diagram 6 (black 1 here), White extends at 2. However, he will run into trouble because of damezumari with his marked stones-remember the principle of stealth.
Solution to last week's problems
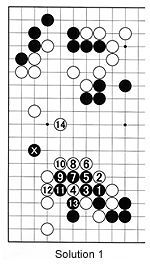 Solution 1 : It is not until white 10 in this diagram that it suddenly becomes apparent that White has not misread the ladder and that Black is being squeezed while White is building a tremendous wall. After Black captures a couple of stones with 13, White plays 14 and swallows up the marked stone. The result of the game is an easy win for White. In effect, White sacrificed a couple of stones to gain an overall advantage.
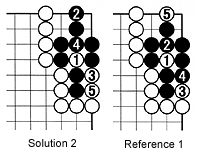 Reference 2A : Why is white 1 such an effective move? After Black secures the corner eye, White throws Black off-balance with 3. If Black captures with 4, check out this situation versus ko by re-reading the comments for Diagram 2.