
Oda Nobunaga, the first of the three great warlords who carried out the task of unifying Japan after a long period of civil strife, visited Kyoto in 1578 and summoned Nikkai for an audience. Nobunaga was so impressed with Nikkai's tactical skills that he called him Meijin-now the title of one of the three major tournaments in go.
Nikkai established the tradition that the head of the Honinbo House must become a Buddhist priest, a practice that was followed by Inoue, Yasui and Hayashi, three other go schools established about the same time. The Honinbo and Inoue schools were affiliated with the Nichiren sect, and the Yasui and Hayashi schools with the Jodo sect. The schools officially date from 1612 when their members were awarded stipends by the government in what constitutes the origin of the Japanese professional go system.
Subsequently, the Honinbo title became a hereditary title until the 21st Honinbo, Shusai, who was Meijin as well, surrendered the title to the Nihon Kiin (The Japanese Go Association). The first Honinbo tournament was held in 1939 and won by Riichi Sekiyama. At first, the title match was held every other year but from 1950 it became a yearly event. Last year, O Meien took the title from Cho Sonjin who, the year before, had dethroned Cho Chikun, holder of the title for 10 straight years.
O Meien defends Honinbo title
It looked as if Cho U, a 21-year-old from Taiwan was about to make history by becoming the youngest ever Honinbo. But in the final game of the best-of-seven series with O Meien, Cho lacked the stamina to clinch victory in a tumultuous battle that extended over about three months.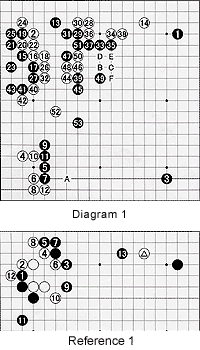 Diagram 1 : The moves 4 to 12 are a joseki, or standard corner exchange, with black A as the move finishing the joseki. However a black move at A would be a waste as White has no effective way of attacking the four black stones here. White 14 resembles a wariuchi wedging technique in that it makes miai by establishing a base along the upper edge and in the upper right corner. Black 15 is natural, but black 19 is a bad move (see Reference 1). The moves 19 to 27 form a recently popular joseki. However, White gets to play at the upper edge first at 28, which both pincers 13 and is an extension from 14. A move at 36 would probably have been even better.
For better or for worse, Black moves out with 29, splitting White's position. However, in the sequence to 53, White has no reason to be dissatisfied-both groups around 28-38 and around 24-52 are alive, while Black's group in the middle still has a flaw-white B, black C, white D, black E, white F. The cut here implies Black might not be able to handle a full-fledged fight on the right.
Reference 1 : Instead of 19 in Diagram 1, Black should have played at 1. White 2 will follow. Black then has a choice of moves-the moves to 13 constitute a joseki. But as this highly favors Black-White's marked stone is in trouble-it is unlikely that this would happen. In particular, white 12 is too much of a safety-first move. White is more likely to play one space to the left of 13 instead. It might have been better for Black to have played 9 in a position around 13 earlier. The idea being that even if a joseki is an accepted exchange in a general context, there is no reason to stick with one if it conflicts with wider strategy.
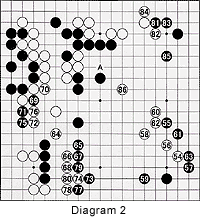 Diagram 2 : White plays 54. No matter where White plays in this area, Black will pincer him, as he does with 55. Black 57 is a relatively new joseki with Black hoping for the result seen in Reference 2. Trying to avoid this result, White plays at 58, which aims at building thickness in the center, and possibly a cut at A. Instead of 59, Black should have played as in Reference 3. Even so, the sequence to 63 gives Black a lot of territory. White 64 is a good probe, but after Black offers to sacrifice his stones with 65, White should not accept. In the sequence to 80, White grabs a lot of territory, but Black builds huge thickness and the freedom or sente to play 81 to 85. White 86 could well be the losing move.
Reference 2 : After black 1, the moves to 14 are a joseki. White is alive, but Black can aim at A, attacking the white group while aiming to close in on the right side.
Reference 3 :Instead of 59 in the diagram, black 1 is severe. If White submits with 2, Black extends to 3. If we get the same moves as in the game, the sequence to 7 follows, which is obviously much better for Black than the actual game played. White's marked stone is left in a strange position.
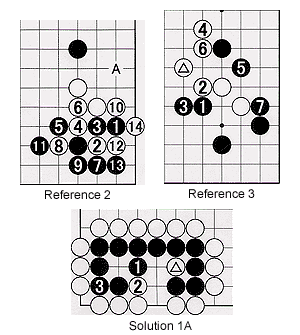
Solution to last week's problems
Solution 1A : This problem has two solutions. Black 1 is simplest. After exchanging 2 for 3, White still cannot pull out his marked stone, which is Black's second eye.Solution 1B : Black 1 works too. White 2 and 4 seem to be able to run away, but black 5 captures three stones.
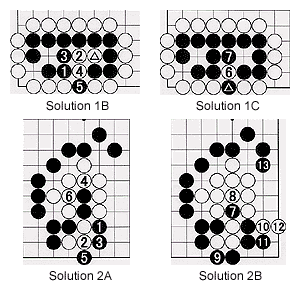
Solution 1C : After Black has captured three stones with the marked stone, White can capture that stone. Black 7 ensures two eyes.
Solution 2A : Black 1 does the trick. Up to move 6, White has no choice but to capture two stones, however.......
Solution 2B : Black 7 is part 2 of this sequence-this throw-in, also called oi-otoshi, takes away White's eye. After White captures with 8, Black connects with 9 putting three white stones in atari. Even if White ignores this threat and tries to make an eye on the side, black 11 and 13 demonstrate this is impossible.
Solution 3 : Black 1 is correct. After White plays 2 to prevent Black from capturing one stone with B, black 3 and 5 capture the three marked white stones. Note that White cannot play at A as this would put himself in atari. Also note that it is incorrect to play 3 and 5 before 1. In that case, White would answer with 4 and A, and even if Black then tried to cut at 1, White could simply connect at B.
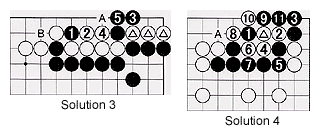
Solution 4 : In response to the placement, or oki, of 1, black 1 and 3 are correct. The combination white 4 to 8 looks dangerous but after black 11, White can't connect at 1 because Black would then be in a position to capture seven white stones by playing at A.