
Secondly, it is often easier to see what places are "big" and therefore stay more focused on a specific goal. Remember, any plan is better than no plan.
Finally, a thick position leaves less vulnerability and, as a result, fewer ko threats-this is clearly shown in the following game.
However, at a higher skill level, playing with thickness is very difficult because you basically bet everything on one big territory and when that fails the battle is lost. Therefore, it is essential to understand when to convert your thickness from a strength that radiates over and controls all parts of the board, into territory.
Upping the ante
Diagrams 1-3 were presented last week, so this week we will start with Diagram 4 and Reference 7.Diagram 4 : White was able to recapture the ko (the marked black stone) with 42. Black 43 is a good ko threat. Cutting on this side will give him the most ko threats (see Reference 7-9). Black 45 (not shown) recaptures the ko. White 46 is the next ko threat. Then Black goes on to do the incredible-he enlarges the ko once more by cutting at 47.
 Reference 7 : If Black cuts at 1, White must play at 2. In this case Black can force with all of his moves-1, 3, 5 and 7-which all have to be answered. Of course after each of these moves, Black will capture the ko. This way he obtains four ko threats.
Reference 8 : In contrast, if Black cuts at 1, White will connect at 2. Black will be left with only one more ko threat.
Reference 9 : You might ask, what about connecting at 2 when Black cuts at 1? Because Black can now play at 3 (as a ko threat) and White has to answer at 4. That is also two ko threats, which looks attractive...until you realize Black got 3 in for free. He played a big move (and got lots of points-about 10-15) while playing the ko.

The point is, you should play ko and ko threats that are advantageous to you so you lose the fewest points possible.
Reference 10 : Following this line of thinking, Black should have captured at 1 and finished the ko. White then finishes his ko threat with 2, after which Black can switch to the upper part of the board and jump to 3 to enlarge his moyo.

Diagram 5 : Black has just cut with the marked stone to enlarge the ko. White captures with 48. Black makes a ko threat at 49, but by now the value of the ko has become gigantic. White has no choice but to finish the ko with 50. But White has no reason to be dissatisfied. Black finishes his ko threat with 51, then White switches back to his old ko threat and finishes that one with 52. Black 53 grabs the upper-right side completely while aiding the lonely black stone in the lower-right corner. The question is what is the next move for White.
Reference 11 : Instead of white 50, White could answer Black's ko threat at 1 (49 in Diagram. 5) with 2. But then, when Black captures with 3, no ko threat will be big enough. For example, white 4 and 6 are huge, but even if Black keeps answering with 7 through 11 and White gets to play at 12 and 14, black 15 gobbles up the marked stone. If White plays 12 at 15, Black expands his moyo with A, white B, and black C is still a threat. Because of the enormous thickness, the lower-left corner radiates (compare with Reference 10), and White cannot win. In other words, he cannot afford to answer at 2.
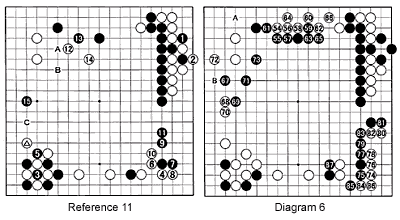
Diagram 6 : Kobayashi chose the invasion at 54. This is a standard invasion and the moves to 53 form a middle-game joseki. Here, white 54 is necessary to live. White lives but Black gets compensation by building thickness. Next, Black uses the power of his center thickness to play at 57. It would be a mistake for White to run out into the center as this would give Black a chance to attack. Therefore, White makes a makeshift base with 72, making miai of living in the corner with A and connecting with B. Black plays 73 to keep his thickness intact and White grabs more points by invading at 74. The moves to 86 follow naturally-then, trying to increase his moyo, Black plays at 87.
Solutions to last week's problems
Solution 1 is answered in Reference 10; Solution 2 in Diagram 5. This is the way to expand the scope of the ko. The benefits are outlined in Reference 11.Solution 3 : Black 1 is correct. White's best move is 2 (if at 3, Black cuts at 2). Now Black cuts through with 3 and 5. White has to play at 6 and black 7 follows (if Black plays 7 at A instead, it becomes ko, which is not good). White now captures at 8 but Black fills in at the point where the marked white stones were captured with black 7. White cannot play at A now (this puts his own group in atari) but he can play at B. Black just pushes in at A to turn White's capture at 8 into a false eye.
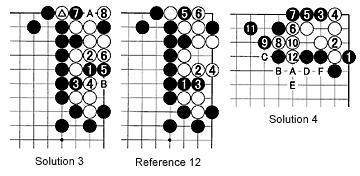
Reference 12 : (Note that playing first at 1 is wrong.) White would not block at 3 but instead build an eye with 2, black 3, white 4. Black 5 is answered by white 6. Now White has two eyes.
Solution 4 : White's best move is filling in at 2. Black could try to take away White's eyes with the 3 and 5 combination, but white 6 to 10 are sente. White then breaks out with 12. If Black tries to block White's path with A, white B, black C, white D, black E and white F, capturing two stones, would follow. Obviously, Black is unable to play at 3, but, any move around C-F, threatening the tesuji at 3, is dangerous for White.
New Problems
 Problem 1 : In Diagram 6, Black has just played at 87. White has several courses of action, not limited to replying to 87, he could take. Black's profit in the upper-right corner (about 40 points) and White's profit in the lower-left corner (about 45 points) almost offset each other. Where should White move to stop Black making more points ?
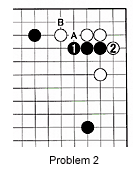
Problem 2 : This is part of joseki. After black 1, White usually answers at A or B. White 2 is a trick move. How can this be countered ?