Making the connection
One of the most elementary plays in go is to link a weaker stone to a stronger one, whether it is a single strong or part of a group without eyes. Even two relatively weak groups with one eye each may hook up to get something much more substantial.As you will see in the accompanying diagrams, connecting can be done in various ways. Usually, all connections have advantages and disadvantages. Roughly classified, there are simple connections, diagonal or hanging connections, solid or hard connections and loose connections.
It is not always clear which type is best for a particular situation, and depending on the position of the surrounding stones, the situation may change.
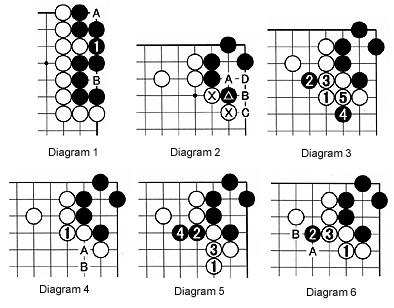
Diagram 1 (simple connection) : Black 1 connects two groups with one eye (A and B) each and by doing so ascertains life. To capture the black stones, White would have to play at A and B at the same time. This is, of course, impossible.
Diagram 2 : In this situation, it may look as if White can capture the marked black stone by cutting at A. However after black B, the best White can do is C allowing Black to connect with D. In other words, the marked black stone is connected as it stands.
On the other hand, White's marked stones can be cut at two places. What can it do to stop this threat ?
Diagram 3 (diagonal or hanging connection) : White 1 is a double diagonal connection. However, the disadvantage is that Black can now play 2 and 4 and White has to respond with 3 and 5. The resulting shape is not good for White.
Diagram 4 (hard/solid connection) : White can also make a hard or solid connection with 1. But now Black can make a nozoki move at B or, even worse, cut at A. The latter is too dangerous a threat to ignore.
Diagram 5 (diagonal connection): White 1 is another diagonal, or hanging, connection. However, Black will cut at 2 and after White's connection at 3, threaten to move out with 4 (although he might not immediately do so).
Diagram 6 (solid connection): White's best move is the hard connection of 1. True, Black can force with 2 and eventually White will have to answer at 3, but before doing so, he might push with B or attack the black stone in another way. Notice that Black cannot cut at 3 as white A would capture him in a geta (net).
Solutions to last week's problems
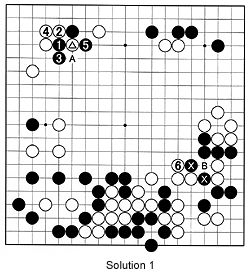 Solution 1 : If Black wedges in at 1, white 2 and 4 offer the greatest resistance, but black 5 captures the marked white stone in a ladder (as we saw last week). However, White will not play out the ladder; instead he will play at 6, constituting a double threat. Next, he can play at A and salvage the marked stone, or alternatively, if Black captures at A, White plays at B, putting the two marked black stones in atari and destabilizing and probably even killing the whole black group in that area. That was the reason Black could not play at 1 and had to resort to playing at 2 in the actual game.
Solution 2A :
In this position, black 1 is the vital point. In response to white 2, the combination black 3, 5 and 7 stops White from forming a second eye, killing the group.
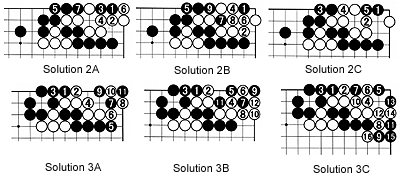
Solution 2B : In response to white 2, Black does not need to do anything (next move, 3, is not shown). Even if White plays 4, the combination of 5, 7 and 9 robs White of a second eye, again killing the group.
Solution 2C : If White tries to get two eyes by playing at 2, black 3 and 5 form a lethal combination. Again, White is doomed.
Solution 3A : According to professionals, after black 1 and white 2, Black should have connected with 3. The moves 5, 7, and 9 allow White to start a ko with 10. But after black 11, if the ko threats and other moves made in the game follow, Black will win the ko, and by doing so, his position after winning it, will be better (thicker) than the one in the actual game.
Solution 3B : However, when pondering what would happen if White plays 4, I found the combination white 6, 8 and 10. Although it allows Black to capture three stones with 11, white 12 brings the group to life.
Solution 3C : As an alternative, black 5 and 7 may look sharp, but exchanging white 8 for black 9 before defending at 10 avoids an obscure ko Black could start. After this, the best Black can do is get a seki (a stand-off, meaning both the white group and the black group in the corner are alive as neither can play at the 2-2 point). However, white 16 destroys Black's outside position and dissolves the seki. We can say White can get a ko whatever happens, but if Black plays 1 and 3 as indicated by the original commentary, White can live.
Problems
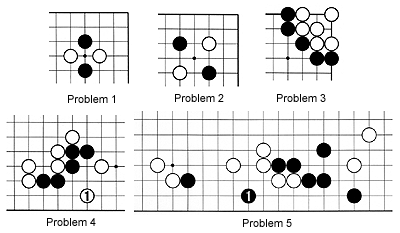
Problem 1 (beginner) : Black to play and connect his stones.Problem 2 (beginner) : Black to play and connect.
Problem 3 (beginner) : Black to play and connect.
Problem 4 (intermediate) : After White makes a nozoki move at 1, how does Black connect ?
Problem 5 (advanced) : How does White respond to Black's move at 1 ?