
Think globally, sacrifice locally (**-****)
Self-sacrifice was long regarded as a virtue and a means of attaining spiritual growth and ethical success, though in recent years it has lost much of its appeal, apparently due to changing ethical standards. Fortunately, sacrifice has never lost its advantages in chess where it is often employed as a tactical maneuver aimed at material gain.On the go board, sacrifice can be a way to reap a local profit. However, its best application is for larger issues involving whole board situations. In other words, local sacrifice is a strategic weapon enabling neighboring stones to survive or to get an advantage somewhere else. While strategic sacrifice may not gain any local advantage, it could help the surviving stones achieve a better balance or better overall efficiency.
Tactical sacrifice
Application 1
One of the primary tactics employing sacrifice is to kill an opponent's group.Diagram 1 : The marked black stones have only three liberties left and appear to be in trouble. But if Black plays at 1, thereby sacrificing three stones when White plays at 2, we get a situation like that in the next diagram.
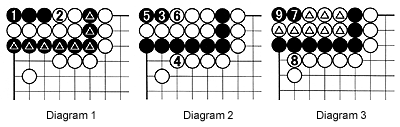
Diagram 3 : In the final stage, black 7 takes the penultimate liberty of the white group, while white 8 does the same to Black's surrounding stones. But black 9 captures the eight marked white stones and sets his own stones free.
So in this example, Black sacrificed five stones so that he could capture eight stones and free his own stones.
Application 2
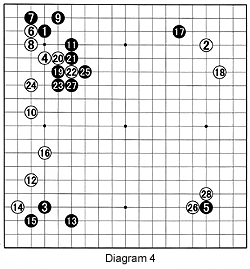 Diagram 4 : In this fuseki, Black is trying to build a moyo (framework) on the upper side by playing 19. Normally, White would answer by playing at 24 immediately, but by cutting with 20 and 22 first, Black is forced to capture the cutting stone of 22 in a ladder with 25. White plays a ladder-breaker at 26, which Black has to answer with 27, followed by white 28. In effect, White has sacrificed a stone (22) at one side of the board to gain advantage on the other side by playing two moves (26 and 28).
Strategic sacrifice
On the go board, stones are deployed to work together efficiently.Diagram 5 : The sequence shown here represents one of the many variations of the avalanche joseki, so-called for its placing stones in a concentrated area. Here, Black sacrifices three stones in the corner to build influence toward the lower left and, to a minor extent, toward the upper right.
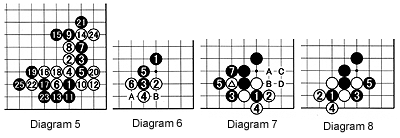
Diagram 7 : If the ladder is good, Black can cut at 1, white 2 will follow and the moves to 5 are forced (capturing the marked white stone in a ladder). White now plays tenuki (somewhere else). Black should play at 7 to remove the threat of White saving the marked stone (by playing a ladder-breaker). Later on, Black can exchange A for B and C for D. Even though he has used two extra stones, Black has increased his influence significantly.
Diagram 8 : If the ladder is bad for him, Black has no choice but to cut at 1. White captures that stone with 2 and 4, but black 3 and 5 secure a fairly large corner.
There are a great number of joseki that employ tactical sacrifices to gain a strategic advantage elsewhere.
Solutions to last week's problems
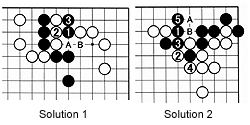 Solutions 1 : Black 1 is the only correct move. If White plays 2, black 3 captures three white stones. If White plays at A, black B increases White's loss by another stone.
Solution 2 : Black 1, without any atari, is correct. White cannot cut at 3 as his two stones would be captured by a black move at 2. Therefore, White has no choice but to play at 2. Now black 3 links all his stones together. Black must play at 5. If he does not, White can play at A, making miai of connecting at B and at 5.
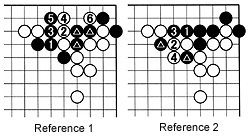 Reference 1 : Black 1 would lead to a collapse in this area. In the sequence to 6, White captures the three marked stones plus the rest of the corner.
Reference 2 : The other atari at 1 in this diagram would lead to isolation of the two marked black stones with the sequence to white 4.
Problems
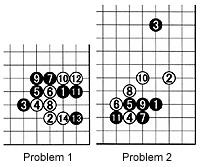 Problem 1 : These moves form a joseki. Black 11 and 13 are innovative. Black intends to sacrifice his three stones in the corner. How can he benefit from this? Note that black 11 increases the number of stones sacrificed but it also helps increase the thickness that Black can build by doing so.
Problem 2 : This problem combines the wisdom of last week's lesson about not allowing an atari and this week's lesson on sacrifice. What is White's best move after Black cuts with 11 ?