Bad style vs good style
Diagram 1 : (bad style) When Black plays a move somewhere on the board, for example on the star point, it is bad style for White to attack by playing against that stone with a move such as 2. If Black extends his stone to the outside with 3, some players will try to stop him by playing another attachment with 4. But even if Black simply plays at 5, it is clear that white 2 and 4 are separated without any chance of connecting, while Black's three stones are strong.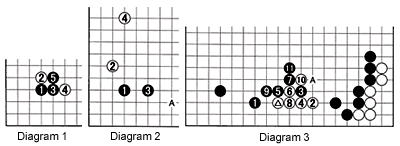
Diagram 2 : (good style) A better way to attack is by leaving distance between the stones. A standard way of attacking black 1 at the star point is the kakari of 2. If Black defends with a move around 3, White will build up his own position and then mount another attack at A.
Diagram 3 : (good style) How should Black attack the marked white stone ? By playing from his weakest stones to force White into a direction where he is already strong. The reasoning for this is that even if White plays a few moves around 2, they will have no impact on the Black wall to the right. Black 3 and 5 are a good combination that build influence for Black while containing White. Note that white 6 and 8 and black 11 are all good style. After black 11, White really should add a move at A, otherwise Black will attack there.
Diagram 4 : (bad style) After black 5, cutting at 6 allows white to push ahead with 8 and 10. But after white 18, it becomes obvious White's stones are ineffectively placed. White 6 is lost with few possibilities remaining. The exchange 17-18 is a loss for White of at least 10 points and even after using so many moves in this sequence, White is still not alive 100 percent.
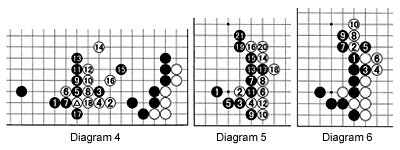
Diagram 5 : (good style) This is a joseki that was played during a recent game on TV. After black 7, White can connect at 12 but he can also push at 8 to build more influence on the right. Black 9 makes the cut at 11 sente, allowing Black to extend to 13. The order of moves of 15, 17 and 19-21 is instructive. If Black omits 17 and plays at 19 instead, White connects at 17 to make a shape without losing points. Omitting atari at 20 by just playing at 19 is good style for Black, too.
Diagram 6 : (bad style) Playing atari at 5 is bad style. Black 7 and 9 allow White to stay ahead.
Diagram 7 : (bad style) Conversely, if White were to play at 6, Black would play atari on the other side at 9 and 11, then play at 13 and 15. White will have a hard time dealing with black 11 and 9.
Effective vs ineffective shapes
Diagram 8 : This shape is called an empty triangle and is ineffective.
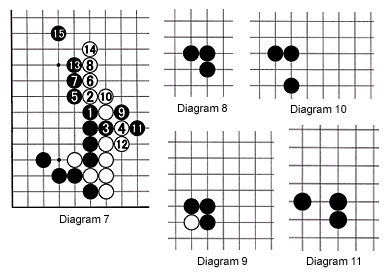
Diagram 9 : This shape is very different as all the black stones play a role in connecting with each other.
Diagram 10 : To make his stones effective in Diagram 8, Black should have played them in the manner shown here.
Diagram 11 : This diagram is a mirror image of the previous diagram, although this is not always noticeable in a real game. Also, many people have trouble remembering the mirror image of a shape.
Diagram 12 : If the shape is like this to begin with, then Black usually won't need any reinforcement as he can connect at A or B at any time. Problems
Problem 1 : After white 12, where should Black play ?
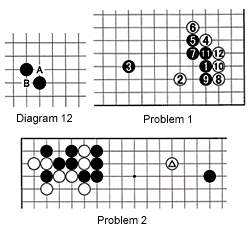 Problem 2 : White has just invaded with the marked stone. How should Black attack that stone? You should consider which of your groups is strong and whether that group needs reinforcement.
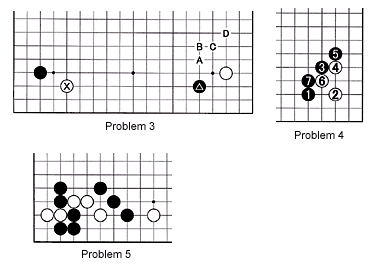
Problem 3 : It is Black's move. How should Black attack the marked white stone ? Consider that black A or B are sente. White will usually answer at C or D, respectively. In other words, the marked black stone is not that weak as he can build a wall. On the other hand, there is no pressing need to make the exchanges A for D or B for D, which are disadvantageous to Black in terms of points.
Problem 4 : This is part of a joseki. Where should White move next ?
Problem 5 : White looks to be in trouble. Fortunately, it is his move. How can White ensure a good shape-without making an empty triangle ?