
Honte is a term used to describe a move that really takes care of a problem without leaving behind any weaknesses that can be exploited later. Sometimes it is hard to determine whether a move is honte or just slow and lacking dynamics. Examples from professional games give some insight into the fine line between them.

Diagram 1 shows an example of honte. The moves 1 to 11 are a joseki, with White getting the corner and Black capturing white 6 in a ladder. Of course, if White plays a ladder-breaker (move 12, not shown), Black will answer with 13. However, even when White plays a move that does not affect the status of the ladder, Black's next move should really be at 13-honte.

dia1-dia4
Diagram 2 : In response to 1, I often see people play at 2 and 4. This combination, they believe, protects both the corner territory with 2 and allows White to stick out his head with 4. So what is wrong ?

Diagram 3 : Usually, the best way to answer black 1 is to play at 2. But now black 3 poses a problem. To get the best deal in terms of territory, white 4, 6 and 8 are a good combination. Now compare diagrams 2 and 3. Diagram 2 seems to promise territory amounting to 15-18 points, but in diagram 3, White winds up with about 12 points. And this is only a territorial comparison. The real difference lies in White's mistake over black's two stones on the left. They looked somewhat weak, but after the moves in this diagram, they look strong and are showing some eye space, too.

Diagram 4 : But what about white 2 in answer to black 1? This is a little harder to explain and that is the reason why amateurs do not play honte when they need to. After this exchange, Black can aim at the double nozomi (peek) of A. But to do so, he needs some back-up, e.g. a stone at B or C that, in effect, threatens White's position while defending Black's. In addition, black moves at D and E will also require careful answers that cannot completely eliminate the bad potential (aji ga warui) that black 1 is sowing. In short, White is severely handicapped in any fight that may erupt on the right or lower side.

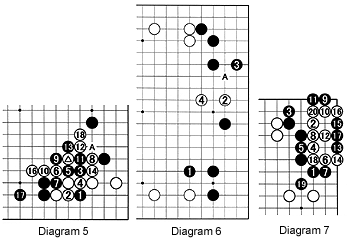
Diagram 5 : After white 2, Black cannot immediately play at 3 and 5 to cut off White's route to the center. White 8 is a splendid move that squeezes Black's cutting stones, leaving Black with a group of stones under heavy attack while White builds positions on both sides. However, a move around A (or 18 or 14, etc.) will invalidate this sequence, leaving White with little elbow room to fight in these neighborhoods.
dia5-dia7
Diagram 6 : This is an example from a professional game. When Black expands his territory with 1, White invades with 2. While playing through this game, I was tempted to play 3 at A. When I saw Black play at 3, I first thought that he must be ahead and wanted to play safely. But after a while it dawned on me that black 3 is a perfect example of honte. Even if Black played at 3 at A, White will jump to 4. What would have happened then if Black had chosen A ?

Diagram 7 : At some stage ,White may want to invade at 2. Black 3 looks natural, but if Black keeps answering with natural moves, White manages to stay alive (makes seki) in the sequence to 20. This is a severe loss for Black. To prevent this, Black would have to use an extra move. It becomes clear that playing the honte in diagram 6 is preferable to spending an extra move for a bit more of territory.

Answers to last week's problems

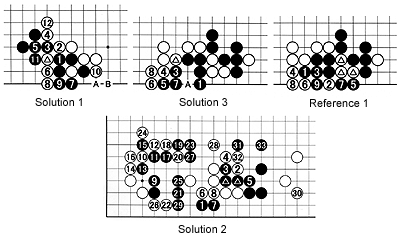
Solution 1 : White's original move (marked stone) is captured, but in exchange, the moves 4, 6 and 8 provide White with kikashi sequences allowing him to build a wall. Note that a move at A or B also is sente for White.
sol1-3,refe1
Solution 2 : Before answering the nozomi directly, White should play a counter-kikashi with 2. If he first answers with 6 and 8 later, white 2 might be ignored because then the two marked black stones are unimportant. White 6 induces 7, after which white 8 is essential. Next Black has to fight for his life with 9 to 21. White 22 is a clever move, but Black is prepared to counter with 23 through 27. Note black 31 (kikashi), which forces White's answer before moving into the center himself (black 33).

Solution 3 : In response to the marked white move, Black 1 is the endgame tesuji that Ryu Shikun used in his game to beat Koichi Kobayashi by half a point to win the Tengen title. Incidentally, he beat Kobayashi with three straight half-point wins-the first time this has happened. Black 1 ensures he gets to play 3 to 7 later in sente without adding any other moves.

Reference 1 : If Black plays at 1 immediately, White would play atari at 2, forcing Black to connect at 3, after which white 4 and 6 force Black to add more moves. Compared to Solution 3, the number of moves is the same, but Black has to take the three white stones off the board with 5 and 7 while White will not have to add stones in his own territory. The difference between these two variations is four points-enough to be decisive for the ultimate outcome.

New Problems
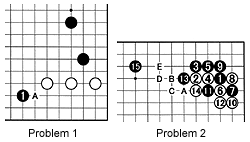
problem1-2 Problem 1 (intermediate): If White plays at A not only does it fail to protect its corner territory, it strengthens black 1. Where should White play ?

Problem 2 (intermediate): The moves to 14 form a joseki. As Black 11 can run away at any time, this position holds bad aji. To counter this, Black might try a move around 15. To deal with this, White could play at A and the sequence black B, white C, black D is sente. But White has a honte move that deals with 11 while aiming at invading at E. What is this move ?

By Richard Bozulich

By Rob van Zeijst

  1. How to teach go
  2. The last rule--ko
  3. Basic strategy of go
  4. Go as a second language
  5. Building castles
  6. The secrets of the lazy
  7. Don't mistake movement for action !
  8. Madmen and common sense
  9. Breaking down the borders
  10. Go the 4th R in school curriculum
  11. Go an educational tool
  12. Mixed-doubles go
  13. Problems and answers
  14. The answer is in the doing
  15. Upsetting common sense
  16. Believing is winning
  17. The art of tenuki
  18. Classification and association
  19. Being in good shape
  20. Keeping in shape
  21. Games of Culture
  22. Deduction and Induction
  23. Asking the right questions
  24. War or peace ?
  25. Avoid simple solutions
  26. The master player
  27. The Ing Memorial Cup in Europe
  28. new ruler on the Kisei Throne
  29. Expectations and reality
  30. Quantity or quality ?
  31. Fujitsu Cup
  32. A Slip of the mind
  33. Losing your bonus
  34. Get out of that groove
  35. New lease on life
  36. Games people play
  37. Changing your mind
  38. Pick your fight
  39. Sanrensei-Part II
  40. Invasion tactics
  41. sanrensei strategy
  42. JAL Cup World Amateur Go Championship
  43. The Honinbo Title: Up for grabs
  44. O Meien becomes new Honinbo
  45. Rote memory vs calculation
  46. The problem with go
  47. The art of stealth
  48. Keep your options open
  49. Where Zen and go meet
  50. Think globally, sacrifice locally
  51. Yamashita the new Gosei king
  52. Toughing it out
  53. The leaning technique
  54. Learning by example
  55. Proverbs guide your hand
  56. Yoda, the new hero
  57. Young turk wars
  58. Evolving game
  59. Solution to last week's problem
  60. Every move is a new board situation
  61. King of ko
  62. Get stronger at ko
  63. Solutions to last week's problems
  64. Answers to last week's problems
  65. Go Training in Europe
  66. Kikashi and Nozoki
  67. Tips from the Pros
  68. Applying the theory
  69. Answers to last week's problems
  70. More on honte
  71. Aggressive players know boshi
  72. Boshi-old hat for go-getters
  73. Boshi-erasing influence
  74. Rui Naiwei-top woman player
  75. last week's problems
  76. Making the connection
  77. More connections
  78. professionals use connections
  79. Solutions to last week's problems
  80. Sometimes a person might wonder
  81. Solutions to last week's problems
  82. Solutions to last week's problems
  83. Guidelines for explaining the game
  84. Handicap in golf and go
  85. Atari-The last liberty
  86. The second technical rule
  87. Concept of territory
  88. The Concept of Life
  89. Mine is bigger than yours
  90. Third line vs fourth line
  91. How low can we go ?
  92. Wariuchi
  93. Changing your perspective
  94. Solution to last week's problems
  95. O Meien defends Honinbo title
  96. O Meien retains his title
  97. Thickness-a hard issue
  98. Upping the ante
  99. Look and understand-cutting is zilch
  100. Bad style vs good style
  101. Solutions and references
  102. In go, most people have,,,,
  103. Two eyes