Look and understand-cutting is zilch
The best thing to do while watching these programs is to try and predict the next move-in this way, every move is a new problem. As the game progresses you are forced to concentrate on different parts of the board where various aspects of the game test your insight. While the players are thinking about their moves, you can think for yourself and with the help of the pro doing commentary, answer the problem.Problem 1 : This situation appeared on an earlier show. The whole board is not shown so some things have to be clarified. The marked black stones are connected to a group at the top that is alive. Black 1 is an attempt to cut off the marked white stone. The ladder favors White-White can play at A, black B, white C and capture black 1 in a ladder. But then Black can cut through White's position. So how would you deal with this situation ?
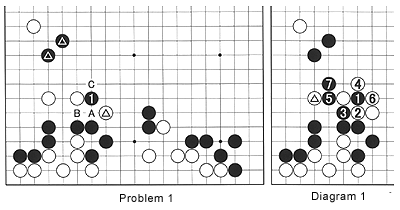
Diagram 1 (Bad for White) : If your argument is "the ladder is good for White, the result must be good," you are wrong. After white captures black 1 in a ladder with 2 and 4, Black discards that stone and captures the marked white stone.
Diagram 2 (Bad for Black) : You might think White could threaten to cut Black with 4 and therefore Black connects at 5, after which White can capture black 1 in a ladder with 6. True, the reasoning is correct but there is a black countermove missing. In other words, this diagram is wishful thinking.
Diagram 3 (Disaster for White) : Instead of 5 in the previous diagram, Black would give atari at 5 first. If White connects with 6, black 7 follows. Now if White tries to capture black 1 in a ladder by playing at 8, Black can run away with 9. This is not a ladder as white 8 will be put into atari immediately.
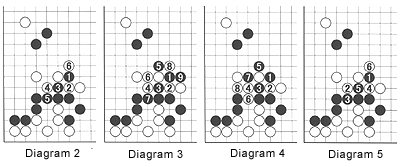
Diagram 4 (Bad for White) : Instead of White answering Black's atari at 5, White could cut through with 6. After Black captures one stone with 7, White captures four stones with 8. Is this favorable for White ? Unfortunately it isn't. Black's thickness in the center is superior to White's profit, especially taking into account that Black's four "dead" stones still have some aji. This result would be inconceivable for pros.
Diagram 5 (Bad for Black) : The answer, then, is changing the order of the moves. White should first play at 2. If Black answers at 3, White captures black 1 in a ladder with the combination of 4 and 6.
Problem 2 : If Black now plays at A, the moves in Diagram 5 will follow and White will get a bad result. So how should this situation be dealt with ?
Diagram 6 : Since connecting at A in the previous diagram isn't worth any points, Black plays at 3 and 5, making his group (almost) alive. White then cuts at 6 and Black cuts at 7. How can we evaluate this result ?
Diagram 7 : Instead of Diagram 6, which is what happened in the game, after White 2, Black had the chance to cut at 3, which would be bad shape and worth close to zero points. After that, White could then cut at 4, forcing Black to make life with 5, 7 and 9. Even if White now tries to capture with 10 and 12, Black lives with 11 and 13 (A and B form two eyes). It is hard to say who is better off in this diagram, but both parties cut without making points which pros really don't like. I hope this will make the result of the moves played in Diagram 6 more understandable.
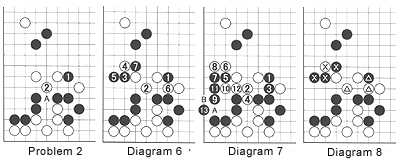
Diagram 8 (Evaluation) : The two white stones and the one black stone marked with a triangle are worth zilch in terms of points, although they did make White a tad stronger. But the stones marked with Xs scored points for Black. In addition, the ladder as shown in Diagram 1 is still possible if Black cuts. Therefore, White has to be careful that the ladder will stay in his favor, which is a liability. On the other hand, Black spent four moves against White's three. Therefore, on a local level, the exchange is about even. But overall as Black was behind in terms of territory and had a lot of thickness already, this exchange was not so important in terms of thickness, but had a significant impact on the territorial balance in Black's favor.
Solutions to last week's problems
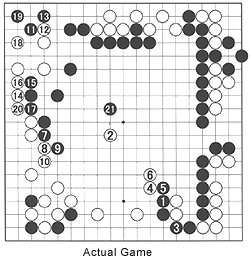 Actual Game : White 2 was moving in the right direction. However, white 4 and 6 were a little slow. After Black 21, the game is very close and probably slightly in Black's favor. In the end, Black won the game by 1-1/2(harf) points.
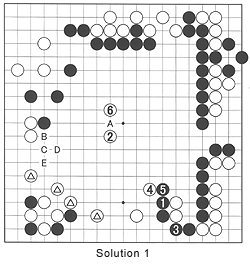
Solution 1 : Instead of the game, White should either have played 2 at A, which would easily make a difference of four or five points. However, Kobayashi (White) may be forgiven for playing at 2 when you think that Black can play B, white C, black D, white E. However white 6 in the actual game was a more serious mistake. He should have played at 6. Sure, Black is strong on the left side but White has a lot of backup from the marked stones and white 4. Had White played at 6, this would probably have ended the game more quickly and in White's favor. Yamashita's win on Black evened the series 2-2. However, in the fifth and last game, Kobayashi won to regain the Gosei title, which he had lost the year before to Yamashita.
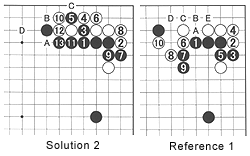
 Solution 2 (Bad for White) : White 2 is a trick move. Black shouldn't answer it immediately, but first force moves 3 and 5 for 4 and 6, then cut with 7 and 9. White now needs to capture with 10 and Black finishes his wall with the sequence to 13. The cut at A does not scare Black, he just forces B for C then jumps to D. White's cutting stone is in more trouble than either of Black's groups.
Reference 1 (Bad for Black) : Black shouldn't carelessly answer white 2 with 3 and 5. Because now White can play at 6 and 8. Black 9 is the best answer but white 10 definitely splits Black's position. After White gets a stone in at 4, he will no longer answer a black offensive at A and C with B and E. Instead he can play at B and D.