
The Honinbo Title: Up for grabs
The 55th Honinbo title match now under way is being fought between defender Cho Sonjin, originally from South Korea, and challenger O Meien from Taiwan. Although its organizer, the Nihon Ki-in (Japanese Go Association), has been trying to hype the matches, the audience has stayed away in droves. The usual public commentaries on the second day of the matches have been put on hold.It is not because of nationality, because last year the match was between two Cho's, Cho Chikun and Cho Sonjin, and they got plenty of attention. It is because neither of the players exhibits a style that appeals to the audience. But don't believe for even a second they are not playing cut-throat moves and engaging in life-and-death battles. They are a good match, with Cho winning the first and fourth game and O taking the lead by winning the second, third, and the fifth game just last week. Their sixth game is scheduled for the coming week and could conclude the match if O wins. If Cho wins, they will play another game the week after. Incidentally, the second game was won by O by just half a point and the fifth by only 1-1/2 points.
 Diagram 1: This is the 5th game of the Honinbo Title Match with O Meien holding the white stones and Cho Sonjin on Black. The moves up to 22 have the appearance of a game that was played 30 years ago when this was a popular joseki. But with the exchange of 23 and 24, both players firmly deviate from established patterns. The fight up to white 36 seems to have a natural flow, but when Black tries to force White into submission, O challenges Cho to a full-fledged battle that doesn's end until white 62. Black 63 immediately starts another fight, and basically this pattern of fight after fight repeats itself throughout the board. Neither player has a grand strategy-they are just crossing swords at every corner: literally !
The games between these two prize-fighters may not make good study material for amateurs, because they are so complicated and involve lots of reading, but they are great fun to watch.
Answers to problems of two weeks ago
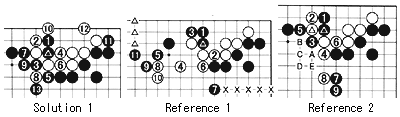
Reference 1: Since capturing the marked black stone is such an obvious debacle as shown in the previous diagram, White will probably try something else such as connecting with 2. The moves to 11 are natural moves, but Black has now been able to make territory on two sides: where the triangles are and where the crosses are. Note that the white stones are not completely alive yet.
Reference 2: But White actually has a better alternative. Instead of trying to capture the marked black stone, White should sacrifice his marked stone, and white 2 is the move to do this. Again Black plays at 3, but this time white 4 is a good move as Black cannot cut at 6. After the sequence to 9, White can play tenuki (elsewhere). Black has no good attack on the white stones as any move from A to E is sente (Black has to answer) for White. White has no definite eye-shape yet, and Black has again profited on both sides, which still gives a satisfactory result for Black.
 Solution 2A: In response to the question how Black can disconnect the marked white stones, black 1 does the trick. If White plays 2, the most natural move, black 3 will put him on the spot. If White insists with 4, black 5 captures one white stone immediately.
Solution 2B: In response to black 1, if White plays at 2, black 3 and 5 will cut off the marked white stones.
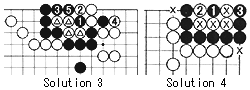 Solution 3: Black 1 is the correct answer. Even if White captures the stone immediately, black 3 and 5 put White into damezumari (shortage of liberties). Therefore, after black 5, White cannot connect at 1 and loses his four marked stones. As we mentioned two weeks ago, if Black starts approaching by playing at 3, White can fill in at 1, which gives him the edge in the semeai (capturing race).
Solution 4: Sacrificing one stone with 1 is the only move for Black. White 2 is futile as black 3 captures the marked white stones. Please note that the two outside liberties at the marked points are essential for Black. If even one of these liberties wasn't there, Black would die.
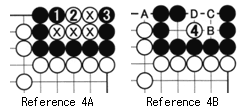 Reference 4A: Here Black has one liberty less than in the previous diagram. Black can still try to capture the marked white stones, but even if he does with 1 and 3....
Reference 4B: ...White plays at 4, giving Black a dead shape. Please try for yourself to capture the black stones. To take the black stones off the board, White needs to play the moves A to D (in any order). Black can capture some stones again, but White can keep filling in liberties from the inside. After white 4, it takes a lot of moves to actually take the black stones-How many ? (Find the answer at the end of this article.)
Solution 5: Black 1 avoids in sente (White needs to answer) White making one point here. Even if White keeps trying with 2, black 3 needs to be answered with white 4. This makes black 1 the best endgame move. You may think that one point is barely worth fighting for, but frequently professional games are decided by a half point, sometimes worth a bucketful of tears and hundreds of thousands of dollars if it involves a title match.

Reference 6: If black 1, white 2 is the correct defense. Black can now exchange 3 for 4 in sente, but, if we now again assume the exchange white A for black B, White gets six points and Black none. The difference between these two diagrams then is three points. However, Black spent an extra move. So when playing the tesuji of 1 in the previous diagram, you have to be aware what its actual value is.
(Answer for Reference 4B: It takes eight moves to physically capture the black stones.)