
Problems and answers
First, let me answer some questions I asked last week. In Diagram 1, Black 1 is the correct answer here. It takes away a liberty from the three marked white stones and by doing so increases the threat of a black move at 4. White 2 is sente forcing Black to answer at 3 to make sure he lives by making two eyes, one at C and the second at D. Finally, White defends his position with 4. Black plays 5 with the aim of cutting at E.This is what happened in the actual game. This also answers another question I posed last week. How does mixed-doubles go effect the level of play ? It does up to a point, but more at a strategic level than a tactical one, as professionals can already read extremely difficult problems by the time they turn pro. So when problems are local, pros are able to solve them as a pair, because the question that has to be answered is clear. But when there is no question to be answered, such as at the beginning of the game or after a problem has been solved, it is more difficult to play the next "correct" move. That also partly explains the difficulty of go-the board is so large. It is often not clear where the problem is or where one might arise and, therefore, there is no clear question to be answered. Fuzzy answers are one thing, but fuzzy questions are quite another.
In Diagram 2, Black 1 is wrong. It looks natural but only serves to provide White with a good answer at 2. If we assume the same moves for White as in Diagram 1, this sequence to 6 will follow. Of course, Black could next play 5 in Diagram 1 but in this case, white B would protect against the cut at A, after which C would be sente as well (if Black does not answer, white D captures two stones).

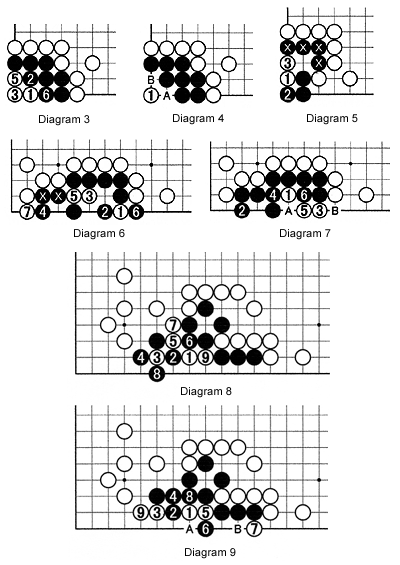
In Diagram 3, Even though Black's eye has five spaces, white 1 hits the vital point. Black's best answer is 2 but after 3 he can plays neither 5 nor 6 as he would put himself into atari and therefore he plays somewhere else. So what happens after that ? White 5 puts Black into atari and Black has to capture with 6. In Diagram 4, white 1 takes the vital point and kills Black.
In Diagram 5, White can play either at 1 or 3. After 1, Black would like to play at 3 himself to make two eyes but this would put his marked stones in atari. After 3, Black is dead.
In Diagram 6, the sequence to 7 is correct because it puts the marked stones in atari as black cannot connect them.
In Diagram 7, one would tend to play at 1, but after black 2, white 3 is not answered by 5 but by black 4. After black 6, White cannot connect at A as black B would capture four white stones. So he has to play at B after which black A makes two eyes.
In Diagram 8, White 1 takes the vital point-so far so good. But after black 2, what to do? White 3 is an unlikely candidate but it works. In the sequence to 9, White puts the three stones around 6 in atari.
In Diagram 9, This is an alternative. If after white 3, Black plays 4, the sequence to 9 kills the black stones. To make eyes Black needs to have a stone at A and B, so when Black captures at A, White will play B.
Problems
In each of Problems 1 to 6, Black moves first to kill White. Since Problem 6 is difficult, here is a hint: Don not give an atari unless White forces you to.