
Solution 1 : Black 1 is the obvious connecting move. Note that by doing this, he cuts White's stones.
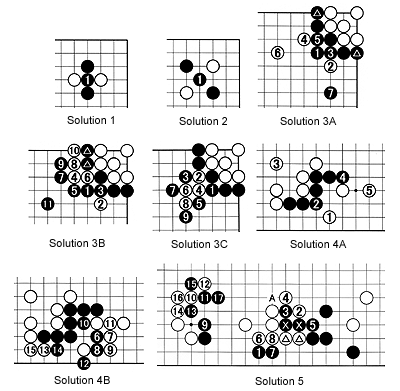
Solution 2 : Black 1 is also obvious, as it again prevents White from connecting.
There were two solutions to last week's Problem 3.
Solution 3A : Making a (double) hanging connection by playing at 1 is one of them. The drawback of this solution is that White can play nozoki moves at 2 and 4. Answering passively with 3 and 5 give Black an ineffective, heavy shape and White may even try to attack the Black stones with a move around 6. Thanks to the marked stones, Black will never become that weak, but making an extension, such as around 7, is a good idea. But Black should be dissatisfied with the overall result.
Solution 3B : If White plays nozoki at 2, Black will usually connect. Otherwise, White would be able to cut in sente (i.e. Black has to answer as the marked stone is in atari and can be captured on the next move). So when Black connects with 3, White 4 seems the logical move. Depending on the surrounding stones, Black may resist with 5. If White cuts at 4, Black sacrifices the two marked stones with 7 and 9, then elegantly connects his stones with 11. Even though White captures two stones (worth four points), he suffers an irretrievable loss as Black's thickness is overwhelming. White probably can play nozoki at only one side and he has to be careful in choosing which one.
Solution 3C : If Black dislikes the prospective of being a nozoki victim, he may want to connect at 1. The prerequisite for that is a favorable ladder if White cuts at 2. However, this means virtually any move by White in the lower left corner will be a ladder-breaker. Black may need to add an extra move for reinforcement. In addition to the ladder problem, White may play nozoki at 3, giving Black a slightly ineffective shape.
Solution 4A : In response to the nozoki play at 1, simply connecting with 2 is usually best. White 3 now defends against a black cut there. If Black plays 4 next, white 5 is a good, light move.
Solution 4B : This is a continuation from Solution 4A. Black can now capture White's original stone (1) by cutting with 6 to 12, but with 7, 9, 13 and 15 White profits on both sides while keeping Black down to one eye. Therefore, Black will not try to save the day but flee to the center.
Solution 5 : This problem is complex. But before deciding what to do about his two marked stones, White needs to play 2 to see if Black is willing to sacrifice the two marked black stones. He learns that Black will not abandon them (see Reference 1). White now can defend in a number of ways. This diagram shows what happened during a professional game where this situation appeared. White 6, forcing the exchange of black 7 for white 8, was clever as it gave White thickness on the outside, while still not allowing Black to connect his two groups on the left and right. Black's group in the lower left survived when he threatened to cut at A, but his group on the right took a severe beating. However, Black won in the end.
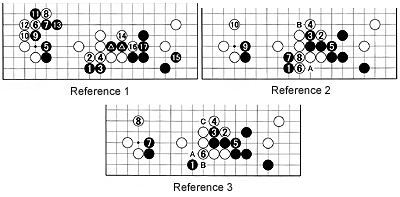
Reference 1 : If White first answers black 1 with 2 and 3 with 4, later on when White plays at 14, the marked black stones have lost their importance and Black will play tenuki (elsewhere), e.g. at 15. Even though White can capture two stones with 16, black 17 just gives them away. Note that to capture the two stones, White needs an additional move.
Reference 2 : Answering black 1 with white 6 (after exchanging 2 and 4 for 3 and 5) would build half an eye at A (because White would need to play one more move to actually make it), but allowing Black to make another forcing move on the outside at 7 intensifies the severity of a possible cut at B. Black will not have trouble surviving.
Reference 3 : Again following the moves 2 to 5 as in the game and then playing at 6 without forcing the exchange white A for black B, is spineless. The cut at C is also dangerous for White.
More connections
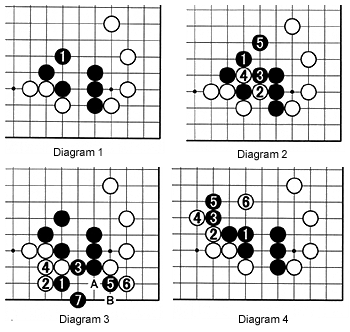
Diagram 1 : As a connection, black 1 is a good move. It helps Black's development more than the connection in Diagram 4.
Diagram 2 : White could play atari at 2, but Black simply plays 3 (it is still ko), and if White takes with 4, Black makes an even better shape with 5. White may seem to take some points, but Black's overall group is healthy.
Diagram 3 : If White does not attack immediately, Black can later fix up his shape with the tesuji at 1. If White answers with 2, Black 3 to 7 ensures life. Note White cannot play at A because Black would answer with B to grab the white stone.
Diagram 4 : Black 1 is slow and heavy. White may continue to attack with 2 and 4, then hit the vital point with 6. Black will have much more trouble moving out to the center than in Diagram1.
Problems
Problem 1 (beginner): When White invades at the 3-3 point, the moves 1 to 10 form a joseki (standard corner exchange). Where should Black play to defend the cut at A ?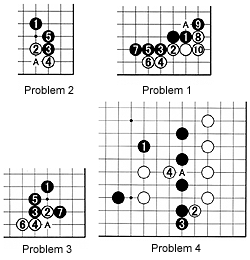 Problem 2 (beginner): This is part of another well-known joseki. Even though Black cannot cut at A, White needs to reinforce his shape. How can White do this ?.
Problem 3 (intermediate): Here is another joseki. After black 7, White needs to defend his stone at 2 from being cut at A. What is his best defensive move ?
Problem 4 (intermediate): This is from a game we will study next week. After Black attacks two white stones by playing at the key point of 1, White first forces 2 for 3, then plays nozoki at 4. Connecting at A is not advantageous for Black. Where should he move ?