
But what does all of this mean when it comes to go ? For one thing, it means you should make good designs or "good shapes." Good shapes in go are shapes that are efficient and leave few weaknesses that can be exploited by an opponent. Last week, we talked about the empty triangle and also a bit about atari, or rather omitting atari.
Solutions and references
Solution 1 : This is a joseki (standard exchange) often played in handicap games. The moves to 12 were given last week. The moves 13 to 15 are the correct follow-up. Notice that the exchange white A, black B, white C and black D is to White's advantage. It is easily worth 10 points. Remember this when studying Reference 2.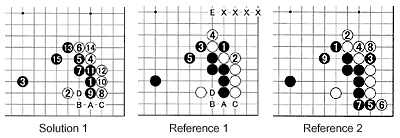
Reference 1 : Some people, especially beginners, play atari when they see an opportunity to do so. However, more often than not, it is better not to play atari. If Black mistakenly plays atari at 1, White will connect at 2. Next, black 3 is another atari and White naturally counters with 4. Black has to cover his weakness with 5. The sequence white A, black B, white C and black D is still to White's advantage. After black 5, White will likely play a move around E to get a good grip on black 1. After that move, White's territory has expanded all the way to the X's and he has no weaknesses. This sequence is worth about 15 points more than Solution 1. Therefore, Black's atari at 1 and 3 have helped White a great deal.
Reference 2 : You may counter that after black 1, White can extend with 2. That is true, but now Black can play atari from the other side with 3-rendering White's shape an empty triangle. After White defends with 4, Black can immediately cash in his reward by exchanging moves 5 to 8, then defend at 9. The sequence 5 to 8 is easily worth 10 points for Black. If you think 10 points is not a lot, try remembering the number of games you lost by less than 10 points. Just by improving this one technique you might change a loss to a win.
 Solution 2 : This was a problem about how to use thickness. The marked black stones are thick-they are solid and strong. Therefore, attacking the marked white stone by playing at 1 is correct. If White tries to make a base, Black plays 3 and 5 to confine White to the side. White needs to defend with 6 to 12, which gives Black the chance to build excellent thickness with the moves 5 to 11, then extend to 13. Notice that one feature of the thickness of the marked black stones is that they are not affected no matter how many White stones appear close to them.
Reference 3 : It is not a good idea to respond to White's invasion (the marked stone) by pincering it with 1. Sure this takes away White's base, but it makes it easier for White to sacrifice this stone. White 2 and 4 are a standard way of creating some defects in Black's shape and at the same time forcing him to become overconcentrated. Next, white 6 is a good double kakari (corner approach). If we follow the joseki shown in Solution 1, White gets a fairly good shape and Black has problems after white 16. If he defends at A as the joseki dictates, White can later escape with a move at B. Playing at B, instead of at A, takes away the threat of White running away, but then White can play at C in sente. So, White's original kakari (the marked stone) might die but he gets enough compensation while Black's thickness on the top left does not work very well.
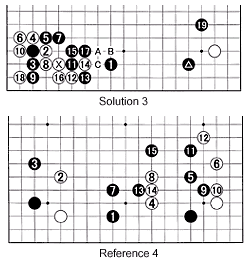 Solution 3 : With the black marked stone and the white stone opposing each other, it is important who plays first. In this case it was Black's turn so he should pincer the marked white stone while extending from his marked black stone with 1-alternative pincers are at 17, 14, A, B, and C, all with their own subtle effects on the ensuing battle. White does not welcome a running battle because Black will always keep the initiative since he played first. Therefore, White can keep things simple by attaching at 2. Although there is plenty of room for variations, the moves to 18 are a kind of joseki. This allows Black to build thickness and keep up the attack with 19.
Reference 4 : White shouldn't try to engage in a running battle by exchanging 2 for 3, then invading at 4. This will start a tough fight, but in general White should be at a disadvantage because he is always one step behind. In this case, the three white stones 4, 8 and 14 appear to be in trouble after black 15.
Solution 4 : This looks a little like a mirror image of Problem 1 and hence Solution 1. Again it is correct style for White, when playing 8, to omit the all too obvious atari at 9. After white 8, Black's best move is at 9. White then breaks through with 10. The combination of 11, 13, and 15 is to Black's advantage. White has no choice but to defend with 14 and 16. It may look as if there is a white cut at A, but that doesn't actually work. However, White can take aim at B which Black answers at A, after which White can invade at D and depending on the circumstances, even at C.
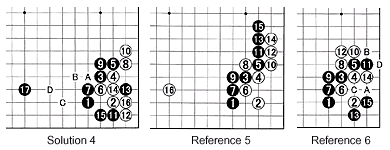
Reference 5 : White 8 and 10 are bad style. White needs to play all the way to 14. He can switch to 16, but the loss of the exchange 10 to 15 is horrendous because it makes Black very strong and only makes one point per move for White. I know there are many people out there who would play this way just to get white 16 in, but the sacrifice of 10-15 is too big.
Reference 6 : A long time ago, I played the moves 8 and 10 against a strong player and was really proud of capturing his stones at 5 and 11. However, Black countered with 13 and 15, taking the corner and a lot more territory. Later, Black had the option of playing A, white B, black C and white D, capturing two stones in sente. It should go without saying that the moves of 8 and 10 should not be imitated.
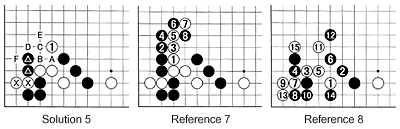
Solution 5 : Making maximum use of his marked stones in the corner, the move white 1 is correct. Black would like to but can't cut at A because of white B, black C, white D and black E. White would capture the two marked stones with F.
Reference 7 : If White plays at 1-an empty triangle-he is just pushing behind the cart up to 5. Next, Black plays the hane (bending shape around enemy stones) at 6. If White resists with 7, Black cuts with 8. White will have a hard time getting out of this situation.
Reference 8 : This problem is derived from the situation in which White invades at 1. This looks like a reckless act, but even if Black applies the thumbscrews with 6 and 12, White can get out with 11 and the combination of 13 and 15. Black will have trouble keeping the whole corner and his outside stones intact.