Every move is a new board situation
When you are in the middle of a fierce battle, it is difficult to take a step back and look at the board as a whole, but a good go player always knows how to do this. A player who tends to take every move by an opponent as a personal challenge often ends up fighting to win every skirmish, while titleholders or top contenders never lose sight of their overall strategy.Solution to last week's problem
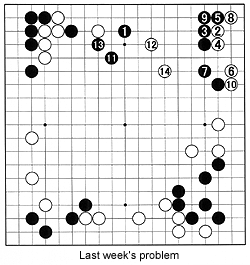 After looking in-depth into tactical sequences that gave rise to joseki, the problem involved a part of joseki. But I revealed it was a whole board situation that O Rissei (Kisei, Black) was faced with when playing Cho Chikun (25th Honinbo, White).
The move that changed the flow of the game is black 1. First, the move is an extension from the righthand corner. Second, it limits White's scope for activities and expansion on the upper side. And third-its most important characteristic-it threatens the white stones on the left. In other words, it is a large move in terms of territory and attacking potential.
White cannot afford to defend his position to the left of black 1 and therefore invades at 2 to try to balance things, at least territorially. Black is quick to yield the corner territory to get sente and plays at 11 to put more pressure on the white formation on the left. Now, a lesser player would be intimidated and become defensive, but this is where Cho stands out. The greater the challenge, the higher he rises to it.
 Without batting an eye, Cho invades at 12, ignores 13 to play 14 and start an attack on the black wall at upper right. If you were Black, where would you play next ?
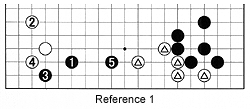
Reference 1 : After black 3, White could defend at 4 (a joseki, or standard exchange), but then Black extends to 5, which hurts White's thin position (marked stones).
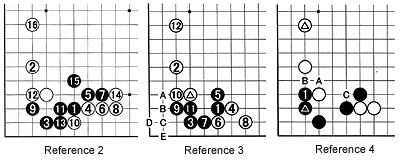
Reference 2 : This diagram though shows a joseki that was developed in South Korea and gained popularity here, mainly because it was a way for White to complicate things and develop on two sides. The sequence to 16 is one variation.
Reference 3 : Playing at 5 seems natural, but it is a mistake. White 6 and 8 are correct and the marked white stone occupies the vital point of Black's formation. Even if Black plays 9 and 11, his corner is not yet alive. For instance, white A, black B, white C, black D and white E.
The following questions are those that a professional would ask himself :
Question 1 : Is a group in danger of dying ?
Question 2 : Is a group in danger of dying after playing tenuki once ?
Question 3 : Where are big points, i.e. extensions ?
Answer 1 : No.
Answer 2 : No, for the lower left corner. Maybe, for the white formation in the upper left.
Answer 3 : A move on the upper side is both an extension and prevents an extension.
I hope this explanation makes the moves in the Solution diagram easier to understand.
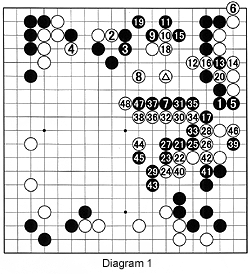 Diagram 1 : After white 14 in the Solution diagram (marked stone here), Black played at 1, a questionable move. Without delay, White played 2 and 4. Black 5 is the follow-up to black 1, and black 7 seems good, but black 9 is another questionable move. White 10 and 12 put Black on the spot. In the game, White hits at the vital point with 28 and 30. In the sequence to 48, the black stones to the right are captured. When White makes a mistake later, Black manages to free his stones. However, White builds up so much influence that proves decisive for the center fight that takes place later. Black is forced to resign about 70 moves later.
Problems
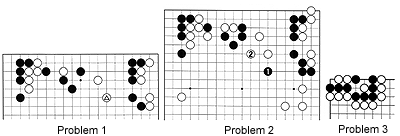
Problem 1 : After white 14 in the Solution diagram (marked stone here), where should Black have played ?Problem 2 : Black has just exchanged 1 for white 2 (7 and 8 in Diagram 1). His next move in the actual game was the losing move (9 in Diagram 1). Where should Black have played ?
Problem 3 : White to play and kill the black stones.