Deduction and Induction
In logic, we often refer to the two broad methods of reasoning as the deductive and inductive approaches.Deductive reasoning works from a more general to a more specific approach. We might begin by thinking up a theory about a certain topic of interest. We then narrow that down into a more specific hypothesis so we can test it. This can be pared down even more as we gather data to check out the hypothesis. Ultimately this enables us to test the hypotheses with specific data, confirming (or refuting) our original theories.
Inductive reasoning works the other way. We begin with specific observations and measures, detect patterns and regularities, formulate some tentative hypotheses that we can explore, and finally end up developing some general conclusions or theories.
These two methods of reasoning have a very different "feel" to them when applied to go. Inductive reasoning, by its very nature, is more open-ended and exploratory, especially at the beginning. Deductive reasoning is narrower and is concerned with testing or confirming hypotheses. Usually individuals unconsciously favor one method over the other that then characterizes their type of thinking.
When people ask whether a particular move is better than another, I answer with another question: "What is your motivation for playing those moves ?"A difference in attitude frequently arises depending on whether the player's cultural background is East Asian or Western. East Asians want the teacher's opinion and then inductively establish a theory that suits the situation. On the other hand, Westerners tend to have a theory already that they want to have either confirmed or denied.
At some stage, though, both the inductive and deductive reasoning processes have a place on the board. To accelerate progress, both processes should be used at one time or another.
The keima
The knight's jump, or keima, in Diagram 1 is a hybrid of the kosumi, or diagonal connection, shown in Diagram 2, and the ikken-tobi,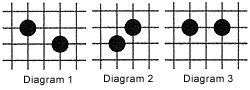 or one-space jump, shown in Diagram 3. The main characteristics of the kosumi are its sturdiness and the ease with which eyes can be formed. Its obvious disadvantage is a direct result of this; it slows a player down. In contrast, the one-space jump is faster, but liable to cutting attacks. Last week, we saw that a one-space jump away from one's stones could also initiate an eye shape. The keima tries to share the characteristics of both the kosumi and the one-space jump. But its weakness is obvious: the shape can be cut quite easily. So why use it ?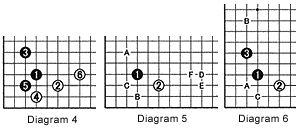
Diagram 5: White's kakari (corner approach) at 2 aims at setting up a double-kakari at A, a suberi (slide) into the corner with B, an invasion at C, or an extension at D, E or F to make a base or to form a larger framework on the right side.
Diagram 6: Black 3, defends against White's most severe threat, namely becoming the target of a double-kakari. This move also contributes in defending against an invasion at the three-three point, called san-san, at A. In addition, if this black formation is attacked, it can now make a base fairly easily by extending to B or defending at C.
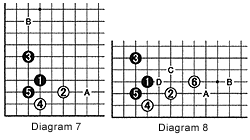 Diagram 7: if White has decided that making a base is the most desirable result, sliding into the corner with 4 before extending is correct. This decision should be made on the premise that invading the corner is unsuitable. Defending the corner, Black's move at 5 looks only natural, but he could also consider a pincer at A, extending to B, or simply playing tenuki (elsewhere). To better comprehend the next diagram, imagine that there is another black stone at A.
Diagram 8: Once Black has defended the corner with 5, it becomes imperative for White to either extend to 6 or, alternatively, to A. Under special circumstances, such as when there is a white stone around B, White may play at C to construct a moyo (sphere of influence) or at D to settle his shape and make eyes quickly (remember that diagonal moves form eye-shapes).
We will look at other types of keima next week.
Now let's look at last week's problems.
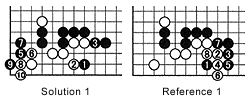
Solution 1: Black 1 strikes at the vital point. White has little choice but to defend with 2, after which black 3 prevents White from cutting. If White plays tenuki, Black can later force 5, etc.
Reference 1: After black 1. White can also try to capture this stone. But in the sequence to 8, Black builds a large wall while White loses its initiative in the end.
Reference 2: If Black forces 2 for 3 in order to jump to 4, White can later (if not immediately) play the placement of 5. If Black resists, he will lose the semeai (capturing race) in the sequence to 15.
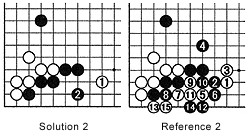
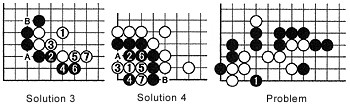
Solution 4: White 1 takes the vital point and incapacitates Black in the sequence to 7. Black cannot play at A, because White can then capture at B.