
Two eyes
Diagram 1 :The four Black groups shown here are small with barely two eyes each-note that these two eyes are two separate spaces. The reason why the groups are alive is because White can't play anywhere inside Black's groups in order to put them in atari. Any white move at this stage would have to be in his own territory.
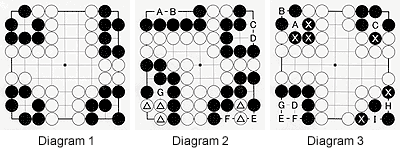
Diagram 2 :
The four black groups in this diagram live in another way. The two groups at the top both have two eyes. So, if White plays at A, Black can answer at B and vice versa. Or White can play at C, which is answered with D, and vice versa. In either case, White has no second move.
The two examples at the bottom are a little different. Neither White nor Black can fill in at E, F or G as any of these moves would put that player in atari. This means that both the black group and the marked white stones are alive because they can't be captured.
Diagram 3 :
The black groups in this diagram are all dead. The group around A is dead because that point is not a real eye. It is what we call a "false eye" and White can always capture the three marked stones as they are in atari.
The group around C also has a problem because C is not an eye. White can capture the marked stone at any time. True it is ko, but Black cannot safeguard the marked stone unless he plays at C-but then it becomes clear that it was not an eye to begin with.
The black group in the lower left also has a problem. He can play at D but then white E will kill him and vice versa. Or he can play at F but then white G takes away Black's second eye and vice versa.
Now compare this group with the lower-left and lower-right groups in Diagram 1.
Diagram 4 :
The white formations here are similar to the black formations shown in Diagram 1 but with one stone missing and Black set to play in each case. Think of these four white formations as four separate cases in which Black can play the first move.
In go a multitude of problems are often given in one diagram. That doesn't mean they are connected in any way. It just saves space to present more than one problem at a time.
In the upper-left group, black 1 puts the four marked white stones in atari. Even if White spends a move to connect at 3, his stones are still in atari. And if he plays elsewhere, Black can always capture the marked stones with 3.
A similar situation appears in the lower-left corner. After black 1, resistance by White is futile. If he plays elsewhere, again Black can capture with 3.
The situation in the upper right is slightly different because after black 1, no white stones are in atari. However, if White plays a move after black 1, he'll put himself in atari. Therefore, he can't play locally. If he plays elsewhere, Black can put White in atari with black 3. However, he also puts himself into atari-therefore, White can capture with 4.
The situation in the lower right is similar to the one in the upper right.
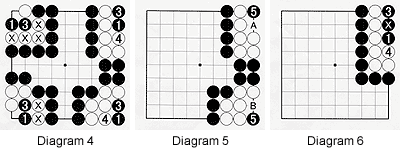
Diagram 5 :
After White captured two stones in each case in the previous diagram, the lower- and upper-right groups look like this. Black can now come back and play at 5 in the upper-right corner. White can capture at A but that leaves him with only one liberty, therefore Black would be able to capture White immediately. Alternatively, if White ignores black 5, Black can capture six white stones by playing at A.
The same story roughly applies to the lower-right corner. After black 5, White can capture at B but it is useless to do so. So in the end White7s six stones will be captured.
Diagram 6 :
Now imagine Black has played the marked stone at some stage and White ignored him (during a ko fight, for example). Black could then play at 1. White can't play locally as that would put him in atari. Now Black 3 puts White in atari. Therefore, White captures three Black stones with 4. Now compare this situation with the white group in the upper right of Diagram 4. Except for two more white stones, the situation is similar, and its Black's move. Therefore, he can kill it by playing in the middle of White's big eye (1 in Diagram 4, at the spot where the marked stone is in this diagram). We now know the white group is doomed.
Problem 1 :
In each of these four cases, Black plays the first move and kills each group. The trick is to find a first move that inevitably reduces the problem to a simpler one than we have looked at so far. Start out with the one in the upper right, then the one below that, then go to the upper-left corner and lastly to the problem in the lower left.
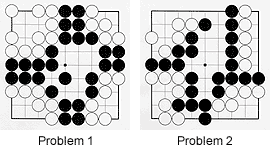 Problem 2 :
In each of these corners, Black can kill a white group. It's his turn to play in each case. Often a good way to kill is by first reducing the potential eye space, then go for the vital point.
Solution 1 :
In each of the cases, black 1 is the correct first move. In each case, resistance by White would only serve to shorten the process of killing the group. The groups in the upper and lower right are obvious. The one in the upper left can be reduced to a smaller eye with 1 as the vital point again. The one in the lower left is quite straightforward too.
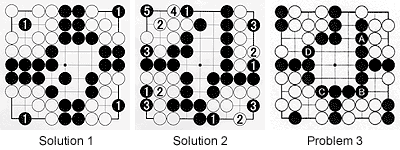
Solution 2 :
In the upper right the solution is to first reduce eye space with 1 and, if White blocks at 2, go for the knockout at 3. In the lower right, the same technique also works well. In the lower left, black 1 puts four white stones in atari so White needs to connect at 2. Black 3 then kills. Note that Black could play his first move at 3 as an alternative-White can't play at 1 to make two eyes because this would put his own stones in atari. In the upper right, Black uses a combination of techniques including reducing the eye space with 1 and 3, then playing at the vital point with 5. Note that even if White captures black 1 on his next move, the space this provides would only become a false eye.
Problem 3 :
The four problems in this diagram look similar. Do the problems in the order A through D as there is a buildup in level. Problem D has an interesting surprise. Black moves first in each case.