
As we saw last week, the third line is the line of territory and is used to make a base, while the fourth line is one of influence. The third line was the most popular line at one time but in the 20th century a lot of players began using strategies employing the fourth line. In the 1950s, innovators such as Go Seigen and Minoru Kitani would even use the fifth line in the opening. Cho Chikun, one of the most influential players today, has been known at times to play his first couple of stones on the third line or even on the second line.
The way the game is viewed is still changing after 4,000 years and new insights have lifted the top level of go by an estimated half stone over the past century. Progress is slow but as the number of professional players worldwide increases, the level continues to improve.
Diagram 1 : This diagram shows the second game for the 16th Kisei title match that Hiroshi Yamashiro (White) and Koichi Kobayashi (Black) played in 1992.
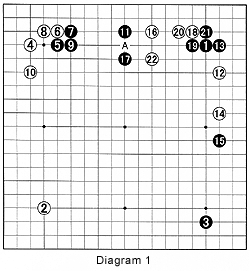
After four moves all corners are occupied. Backed by 1 and 3, Black approaches (kakari) the upper left corner with 5. White has a lot of choice now, but moves 6 through 11 form a joseki, or standard pattern. Alternatively, black 11 could have been at A for a influence-oriented strategy, but Kobayashi likes territory. White plays a kakari with 12. Black 13 intends to turn the upper-right corner, and possibly the upper edge, into territory. White 14 is the correct extension from 12 and together they form a base. Black 15 attacks that base. White would fail to develop his stones properly unless he does something radical. He, therefore, invades at 16, aiming to establish a base there while thwarting Black's territory-oriented strategy. Black 17 seems too conservative, but even with his 7-9 wall, a three-space extension to 11 is a little feeble. To establish a base, White then extends to 18. Black 19 and 21 are a set pattern to make the white base as small as possible. Black 21 is essential to maintain a base while preventing White from making one in the corner. As White can make a base but not fully two eyes at the upper edge, he moves out into the center with 22.
Note that this not only serves to pull out his own groups but also to split the two black groups at the top.
Problem 1 : After white 1 (16 in Diagram 1), instead of A, black 2 looks severe. How does White handle this? (Hint: the three-space extension to the right has a weakness.)
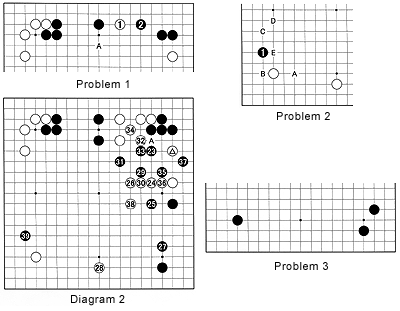
Diagram 2 : Black 23 is natural-it splits the two white groups while providing a route to the center. White 24 is similar to white 22 in Diagram 1. 35 and 37 capture the marked stone while preventing the cut at A.
Problem 2 : After black 39 (1 in this diagram), White has many options. He could play at A, the standard response to kakari, or at B-just as Black 13 in Diagram 1-or at C or D to pinch the black stone, or at E, which is an attachment that makes Black stronger along the edge but helps White in the center. Where should he play ?
Problem 3 : It is White's move. Just looking at the bottom area, where should he play ?
Solution 1A : In response to black 2, white 3 is an excellent invasion. If Black plays 4, the moves to 9 seem forced. White has settled himself with two eyes while scooping out Black's territory.
Solution 1B : In view of solution 1, black 4 may seem a more severe move, but now White plays 5, to create cutting points in Black's shape, and 7 to connect underneath (under means closer to the edge) to form a good combination. Black 8 and white 9 are miai, i.e. if Black plays one, White plays the other. Black 10 and 11 are miai, too. Alternatively, Black could play at 11, but then a white cut at 10 follows. In either case, the marked black stones are in danger.

Solution 2 : In response to black 1, white 2 is correct. Black wedges in at 3, forcing the sequence to 15. Next, white 16 seems perfect. White makes an extension on the fourth line, two spaces away from the marked white stone. This is because instead of making territory with a 3rd line extension, building influence to assist the White group in the center around the marked stone is more important.
Reference 1 : A pincer at 1 would be out of place, because of the sequence given here. The moves up to 17 are a joseki, or standard corner exchange. Black gets to attack white A while making a perfect extension at 18. In addition, a black move around B forces White to capture the three black stones on the left. But black moves around B may later endanger the marked white stones in the center.
Solution 3 : White should play a wariuchi (splitting move) between Black's two positions in such a way that he can make an extension in either direction. White 1 is that move. No doubt, black 2 is a good extension. However with 3, White makes a base. At this point if Black invades at 4, white 5 makes miai of playing at 6 and 7. If Black chooses to play 6 at 7, a white move at 6 gives White a good result. Therefore, Black will usually play at 6, followed by the moves through 9. This is also a joseki.
Answer to last week's problem 4
Solution 4 : Black 1 is correct. No matter what White does, he will not get two eyes. If he plays at 2, black 3 is a nice rebuttal. White can now capture at A, but then black B captures five stones. Or White can play at B, but then Black immediately plays at 3 to capture six stones. This is called a snap-back, not to be confused with a ko, that repeats a situation.
Reference 2 : Black 1 is wrong. White 2 is a splendid move. Black has no choice but to capture with 3.
Reference 2B : Next, after black 5, white 6 slows Black down by one move, in other words, he cannot play at 10 because this would put his own stones around black 5 in atari. In the sequence to 10, White manages to stay alive.