
We have slowly come to the point where playing through professional games has become enjoyable. All the basics we have discussed come together in games professionals play.
Solutions to last week's problems
 Solution 1 : In response to White's marked stone, Black should have played at 2. The sequence to 16 follows. White's corner territory pales compared to the influence Black builds, possibly enabling him to attack the two marked white stones at right.
Solution 2 : Look at Diagram 1-last week, the question was how White should proceed after Black cuts at 1. White 2 and 4 form a wonderful combination.
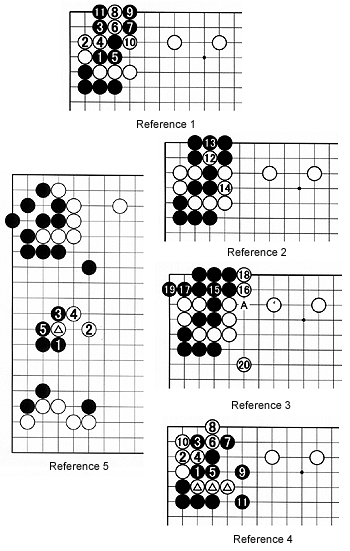
Reference 4 : The best reason to reject this line of reasoning is found in black 9, a move that avoids the trap with the throw-in as shown in the preceding diagrams. Now White is forced to take the corner with 10, but black 11 captures the three marked white stones.
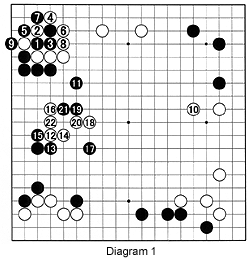 Diagram 1 : Due to the combination of 2 and 4, White can squeeze Black in sente up to 9. Next, he grabs the largest point at 10-this move expands his territory on the right side while preventing an invasion in that area. White has clearly taken the lead.
Black 11 is an attempt to come back in the game by building a huge moyo (framework). White is forced to reduce Black's moyo lightly and the shoulder hit, or kata, of 12 is the perfect way to do this. However, man-y professionals disapprove of white 14 (see Reference 5). After 16, black 17 and especially 19 and 21-hitting the vital point and making White heavy-are an unexpectedly fierce attack.
Reference 5 : This was the alternative given by some professionals, but it also has been criticized-this time for being too lenient in terms of territory as Black stands to make about 35 points in this area.
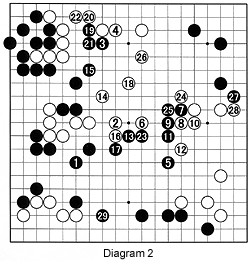 Diagram 2 : Whatever the answer, White's stones in this area are suddenly heavy and weak. Black 1 is an important move. I suspect some readers would find great pleasure in capping at 2, but a white move at 1 in response may prove troublesome. The principle here is to first strengthen oneself in order to attack effectively.
Black thought for a long time to finally attach at 3, then play at 5 and play another attachment with 7. 3 and 7 are two representative moves of motare, or leaning on the opponent's stones, to strengthen one's own stones and attack all the more viciously.
By the way, even though it does not make any territory in itself, black 5 combines three purposes that have great strategic impact:
- 1. It expands Black's lower side-this becomes obvious when black 29 was played.
- 2. It reduces White's potential territory on the right.
- 3. It threatens White's center group while trying to cut off its escape route.
 Black 13 is too local a move and is made in the hope that White will connect his stones. (see Reference 6).
White 14 and 18 allow White to escape and connect to his stones at the top. Even though Black builds significant thickness in the center with 23, making the definite connection with 26 re-establishes White's lead.
Still, black 29 is large and some speculated that Black might stage an upset.
Reference 6 : Instead of 13 in Diagram 2, black 1 is the vital point-notice that it is a kind of boshi, or capping move. White 2 and 4 are a normal maneuver, but black 5 next cuts off the marked white stones. On the other hand, if White exchanges A for black B, before playing at 2, Black aggressively answers at C. At any rate, black 1 makes escape for the white stones more difficult.
Problems
Problem 1 : Look at Diagram 2-Where should White play next ? Hint: First find Black's weakest group of stones and hit its vital point.Problem 2 : When you played through Diagram 1, you may have noticed a reducing technique. With White to play the first move, can you apply that technique here to reduce Black's moyo on the right ?
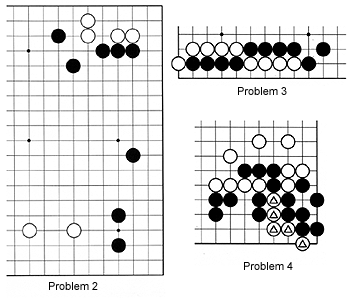
Problem 4 : White's marked stones are in trouble. Your mission: Increase its liberties by one and win the semeai.