New lease on life (**-****)
Your doctor informs you that you have a rare cancer and only a few months to live, but five days later tells you a mistake was made and you are in perfect health. You have been forced to look death in the face and then were given a new lease on life. When confronted with the bad news, you would no doubt be depressed by your failure to fulfill all your expectations and gain some insight into your limitations.You might feel this way when a much stronger go player than yourself criticizes your game. The expectations and thoughts you harbored and the carefully calculated sequences you imagined turn to dust. Although this experience would contribute to improving your play, it could also make you steer clear of stronger players. But these players also had to learn the game this way. And they love it when you ask them a question about go. So do not be shy about asking their opinion.
In exploring moves and their complimentary kosumi, I was helped by Yoshio Ishida, 9-dan and former Honinbo and Meijin titleholder.
Solutions to last week problems
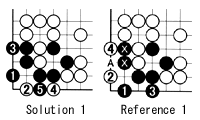 Solution 1: Black 1 is the correct move for Black to live. White 2 hits the other vital point, but black 3 secures life. White 4 is answered by black 5.
Reference 1: Black 1 is the other vital point, but because of damezumari (shortage of liberties), white 2 and 4 are deadly. Black cannot play at A now as this would put his two marked stones into atari.
More on Kosumi
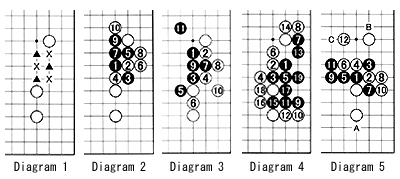
Diagram 1: The white formation shown here is a very common. How does Black deal with it ? According to the theory postulated last week, the crosses should be complimentary moves by one side, while the triangles are complimentary moves by the other. It is best to select a representative member of one side to get an idea of how it works as a whole.Diagram 2: Let's start with the crosses. Black 1 is the representative but in the sequence to 10 all that happens is that White solidifies his territory. In fact, the four black stones may become targets of attack. Because of this result, we should write off the crosses.
Diagram 3: Now look at the triangles. Black 1 is not the most representative member of this family, but the result to 11 is much better for Black than in the previous diagram. We now know that the triangle group suits our purpose. The next step is selecting which of the three members is most likely to succeed.
Diagram 4: With Black playing at 1, the sequence to 19 is just one of the many possibilities. As a result, Black has been successful in staying alive, but at the cost of making White very strong. Black profited locally but White has increased his potential globally.
Diagram 5: What about a combination of moves by the triangle group? Black 1 and 3 form a tesuji combination and the sequence to 12 is a middle-game joseki (standard exchange). White seems to have gained a lot of territory, but actually this position is full of aji ga warui (bad potential). Examples of this are black moves at A, aiming at exploiting the aji of black 7, and B and C, which both threaten to wreak havoc in combination with black 3.
The result, therefore, is good for Black. So the key lies in the diagonally complimentary moves of 1 and 3.
Problems
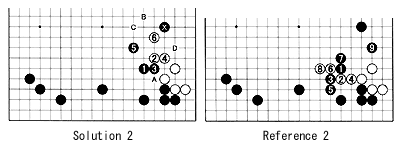
Problem 1: Black's next natural move is at A. Or is it ?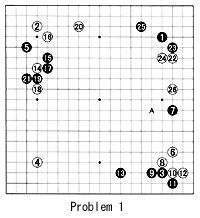 Reference 3: After black 1, White would play his sente moves 2 and 4 (Black has to answer). The moves to black 13 are feasible, but now White has slowly isolated the black group of 1 and 7, etc. But White's next moves range from A to D. This means that he will yield his initiative.
Reference 4: Just to be ornery, or as pros prefer to say "out of kiai (fighting spirit), he should not allow himself to be forced into submission," a pro would want to play at 1. But in the sequence to 8, White gets a thick shape in the center while his marked stones make a very good eye shape. But the principle behind black 1 is right. Now, check through this column and see it you can come up with any additional ideas.
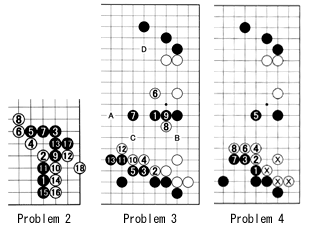
Problem 2: The moves to 9 are a joseki. White then can play 10, etc. But white 18 is a mistake. Black can now kill the group. How? Where should White have played ?