Kikashi and Nozoki
An area where professionals are way ahead of amateurs is that of kikashi (forcing move). For an amateur, it is often hard to determine whether a move is a kikashi or a waste of potential. The average player will decide that a move is a kikashi if it is answered, as this will indicate that he has kept sente (initiative). There is no simple description for a kikashi. If in doubt, follow this rule of the thumb: A kikashi has outside significance while the answer to it usually has no or little value.
Diagram 1: The moves to 19 constitute a common joseki. The moves 7 and 9 form a clever sacrifice combination that make 11, 13 and 15 forcing moves, enabling Black to isolate the white group in the corner. In return, the exchange of white 18 for black 19 is a nozoki (literally, peek), a type of kikashi where the other party has to connect.
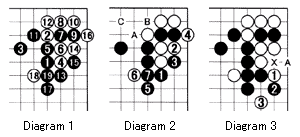
Diagram 2: Why is the exchange 11 for 12 a kikashi in Diagram 1? With the exchange A for B, White can only jump out to C. But without that exchange, White could also opt to play at A himself. Notice that at a later time, Black might want to play at A, but then White would not answer by playing at B.
Diagram 3: What about the exchange 15 for 16? Without it, White can answer 1 with 2, then play nozoki at 3 in sente. In contrast, after 15 for 16, in order to play 1 and 3 here, White first needs to capture the black stone that is at the X by playing 1 and A. It is not before he spends an extra move that White gets to play nozoki at 3. So the forcing move 15 for 16 is good because it slows White down by one move. Also notice that white 16 is on the inside whereas black 15 is on the outside, another feature of a successful kikashi.
Diagram 4: Is the exchange white A for black B a kikashi? Of course. Black B does not perform any other function than connecting while White A might be useful later, e.g. in a ladder.
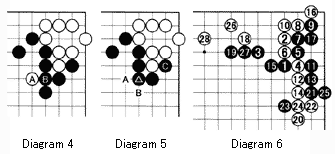
Diagram 5: You may argue that Black could have prevented the kikashi A by playing the marked stone instead. But actually, a black stone at B in exchange for a white stone at A favors Black, because he gets stronger as a result. For example, if White ever captures black C, a black stone at B will guard the resulting cutting point to the right of B, giving him influence in the center.
Diagram 6: The moves to 28 form a joseki. Note the timing of the kikashi exchanges 16 for 17 before defending at 18, and 23 for 24 before ensuring life with 25. In short, you should play the kikashi before anything else because if you do not play out the kikashi exchanges immediately, 10 or 20 moves later those moves may no longer be answered.
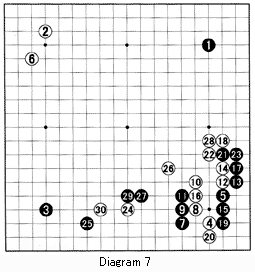 Diagram 7: In this famous game, the second game of the 1971 Honinbo tournament, between titleholder Rin Kaiho on White and challenger Yoshio Ishida, Black makes a crucial mistake in the order of moves 19 and 21. Black 19 makes life and therefore, after black 21 and 23, an immediate defense at 28 is not necessary as it does not threaten the black corner group. Therefore, White seizes the initiative by hitting hard at 24. White first takes another vital point with 26, then connects at 28. Black is now on the defensive due to one careless move.
Diagram 8: Black should have played the kikashi first at 1 and 3, then White would have answered with 4. Black would then play at 5 to ensure life and defend on the other side with 7. Note that A is the focal point for both sides.
Diagram 9: In this situation, black 1 is a terrible move that takes all the aji (potential) away it is called a raw peep (nama-nozoki) and should be avoided at all costs. White has no trouble escaping and then cutting through with 10 and 12.
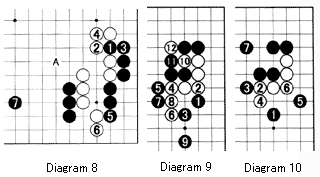
Diagram 10: How should a nozoki move be used in this situation? Black 1 is the vital point. Although white 2 and 4 are bad shape, there is no alternative. Now look at black 5 it is a beautiful nozoki that forces White to make a solid connection before Black plays at 7 to defend his position.
Problems
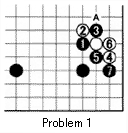 Problem 1: The moves 1 to 3 are a tesuji combination. Eventually White will have to come back and play at A. But before doing so, he can play two kikashi exchanges. How and in which order?
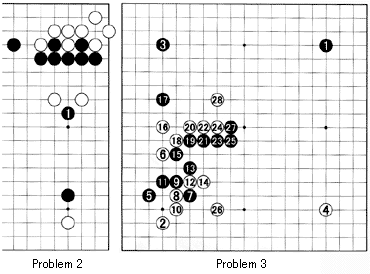
Problem 2: Black has a very strong wall that he tries to use by playing a nozoki at 1. Normally White could just connect his two stones, but this might not be such a good idea. How should White answer black 1?
Problem 3: This diagram shows the first 28 moves from the fourth game of the Oza title match between defender O Rissei (White) and 25th Honinbo Cho Chikun, in which O successfully defended his title. Try to figure out Black's next move.