
But first follow these tips :
Study the position on the board.
Do not just play a stone until you are certain of the solution and have a good idea what your opponent's best move is. Don't spend longer than 10 to 15 minutes on any one problem. You may not find the solution to one of the problems immediately. Don't worry. Just attempt the next problem and return to the previous problem later.
Never look at the solution without being sure of your own solution first.
Try to remember what you are reading on the board. In other words, be aware of your method of solving a problem and of what you are thinking. This will prevent you from going over the same sequence over and over again. This will not produce results and only make you tired.
Do not attempt tsume go problems when you are tired.
In each problem, it is Black's move.
Problem 1 :Kill the white group.
Problem 2 :The marked black stone is dead but still serves a purpose. All other black stones can be made alive.
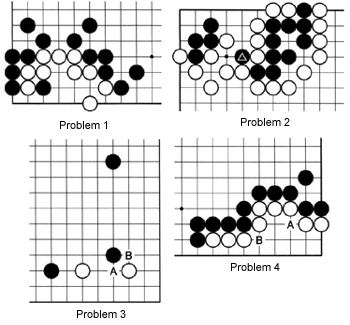
Problem 3 :Where should Black play ? A or B ?
Problem 4 :Cutting seems like a good idea, but where? A or B ?
Problem 5 : Which is more important-A or B ? And why ?
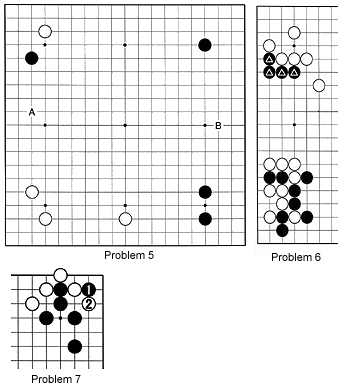
Problem 6 : Black needs to reinforce his marked stones. However, White has a lot of thickness in the lower left. How can Black make some kind of base ?
Problem 7 : When Black made a clamp in the corner, White aggressively tried to cut him. How should Black respond ?
Solutions to last week's problems
Solution 1 : The keima at 1 followed by a tobi (jump) at 3 seem to give Black more agility than playing the kosumi (diagonal move) at 8 as he did in the game. However, compared to the kosumi or the tobi, the keima is a feeble shape masterfully demonstrated by the tsukekoshi of 8 and 10, followed by White's combination of 12 and 14, cutting Black's position. Black is in trouble now.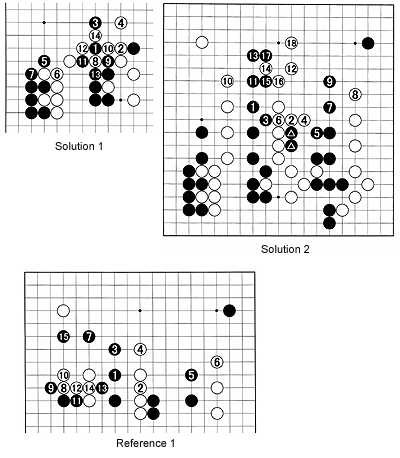
Solution 2 : After black 1 (move 51 in the real game) here, White played at 2 exposing him to a kikashi (forcing move) that Black played without hesitation. Before answering Black's kikashi with 6, White first plays a kikashi himself with 4. Black needs to play 5 to stop the marked stones from being captured. In other words, white 2 has an impact on White's right center group.
Reference 1 : White 2 and 4 seem a safe way of playing but lack forcefulness. We can assume the exchange 5 and 6 just as in the game, but Black need no extra reinforcement and can switch to 7 to take the initiative. Envisaging the moves to 15, White seems to have lost control of the game.
Reference 2 : White 2 may look tempting-it seems to strengthen White's position before he attacks from the other side with 4. However, Black builds up strength with 5 to 9, then, while making a second eye around C (his first eye is around the lower right corner), occupies the vital point of 11. White needs to reinforce with 12-if he does not, black A makes miai by cutting at B and 12-fol-lowed by black 13 to prevent White from cutting there. A black move at or around 15 may prove troublesome. But the main thing to remember is that the exchange 2 for 3 looks like sente but needs later reinforcement. This is called sente-no-gote, i.e. a move that seems sente (keep the initiative), but is actually gote (lose the initiative).
Solution 3 : Look at the Solution 2 diagram. The question was whether the moves 15 and 17 actually strengthened White's position. However, the moves are inevitable and correct.
Reference 3 : If Black just connects with 5 and white 6 follows, a move at 7 might be a good follow-up. However, after White reinforces himself with the moves 8 to 12, he can cut off Black's stones with the combination 14 and 16, and cutting at 18 to 22. It is unlikely that these exact moves would appear, but the threat of the cut at 18 would definitely put a strain on Black's ability to fight in the upper left corner.
Solution 4 : Even though White can force the exchange 2 for 3, black 1 is the correct move. White has to meekly defend at 4, giving Black the chance to put his wall to use with 5.
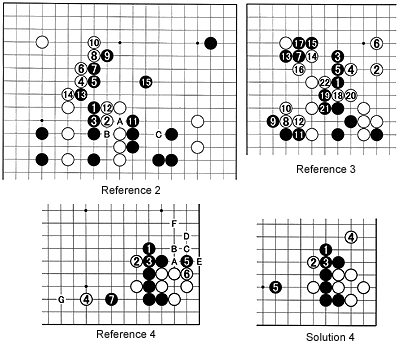
Reference 4 : The reason why black 1 is a good move is shown here. If White were to play at 4, the exchange black 5 for white 6 is a tremendous boost for Black as this move will give him a dominating influence in this area. White can later play the sequence A through F. Black 7 is good enough and if he feels he needs to turn on the thumbscrews, a move at G may be appropriate.