Avoid simple solutions
In go, it is best to give an opponent a number of choices to give him a greater opportunity to make mistakes. In other words, we should not make a move that would allow an opponent to make the obvious, or correct, response.Diagram 1: The marked black stones, which form a keima (knight jump), are cut in the worst possible way while the white stones are placed optimally.
Diagram 2: Even this position is better for Black as at least he has a fighting chance to connect all of his stones.
Diagram 3: Before Black plays a tsuke (adjacent to) at 1, the lone white stone has four liberties. Through the sequence to six, Black only succeeded in increasing White's number of liberties to seven. With the moves 7 to 15 Black succeeds in keeping the number of liberties down to seven but with 8 to 16 White maneuvers his way out. By the end of the diagram, Black is left with the four self-created cutting points A through D. What went wrong ?
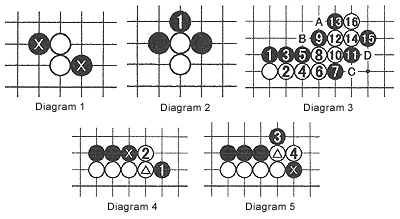
Diagram 5: Black then plays 3, which again forms a keima with the marked black stone. But when White plays 4, that move teams up with the marked white stone to slice Black's keima in the worst possible way. Black then repeated this procedure a couple of times and the result was catastrophic for him.
In other words, Black forces White to play good moves. Worse still, White has no choice but to play these moves, which are ideal.
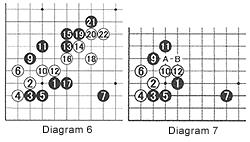 Diagram 6 shows a kind of joseki. The moves to 7 are frequently played. White can play tenuki (elsewhere) now, but if there are black stones in the upper left, black 9 is a strong move. White 10 is a standard response and the moves 14 to 18 are aimed at ensuring that White can move into the center in the sequence to 22.
Diagram 7: For stronger players the previous diagram may look natural, but I'd like to single out black 11 as a move that deserves attention. Black could have played at A. White would still have played 12 and then the black stone at A and black 1 would form a keima split in the middle by white 10 and 12. That is the reason that Black drops back to 11. From experience and diligent study, stronger players know that white 12 is the best move in this situation, but it is not nearly as obvious now. Less experienced players might play A, which is not a bad move, or B, which is.
Solutions to last week's problems
Solution 1A: In response to black 1, white 2 is best. Black can now force a seki with the sequence to 7. To understand why is this a seki, refer to Diagrams 4 through 8 in last week's article.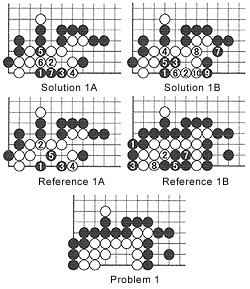 Solution 1B: White's response at 2 is inferior, because White not only ends up in gote, thus losing the initiative. Black 9 becomes sente and white 10 is forced to maintain the seki.
Reference 1A: White cannot play at 2 (or 4) because Black's combination of 3 and 5 kill him (if White starts out with 4, Black changes the order of 3 and 5).
Reference 1B: To understand why White is dead in the previous diagram, imagine that Black has filled in all surrounding liberties. White 8 captures five stones. The result is shown in Problem 1 below.
Problem 1: Black moves first and kills White.
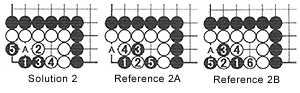
Solution 2: Black 1 is correct. The moves to 5 ensure a seki.
Reference 2A: White 2 seems more aggressive but after black 5, White has nowhere to go. However, Black can start a ko at A at any time he likes, putting White at a huge advantage.
Reference 2B: Starting with black 1 is incorrect as white 2 to 6 give White an eye, while Black cannot play at A. This means that White can capture the intruders at any time he wants by starting a ko at 2. Black cannot win this ko. Therefore, White does not even need to start it. The black stones are dead.